A Homeowner’s Guide to Florida Impact Window Replacement

The last time a storm came through, a neighbor stood in his living room with a roll of duct tape and a look of pure regret. He’d owned the house for eleven years and had never once thought about the glass. I get it. Nobody buys a house thinking about fenestration. Then June rolls around, the forecast turns ugly, and suddenly you’re pricing plywood again.


So here’s the deal. If you live anywhere in Palm Beach County, you have three realistic options: shutters that live in your garage, plywood and crossed fingers, or windows built to take a hit. This guide walks through how impact window replacement actually works, what drives the price, and how to inspect a job without a clipboard full of jargon. By the end you’ll know which questions to ask and which upgrades are pure upsell.


One more thing worth saying early: picking the installer matters more than picking the glass. A great product in the hands of a crew that skips flashing is a leak waiting to happen. If you’re north of the county line and want a sense of how a specialist shop runs an assessment, this look at window installation in Loxahatchee shows the kind of local back-and-forth you should expect from anyone you hire.

Why Florida windows live a harder life than most

Coastal South Florida sits in a region the National Weather Service tracks for hurricanes, tropical storms, and punishing summer heat, and that combination wears on windows from two directions at once. Wind pushes against the frame. Sun bakes the seal.


Ordinary annealed glass doesn’t fail gracefully under pressure, it shatters into shards that become projectiles once wind gets inside. Impact glass, by contrast, sandwiches a plastic interlayer between two panes, so a missile can crack the surface without blowing the opening apart.


Seals matter just as much. Between salty air, humidity, and daily temperature swings, gaskets dry out and lose their grip. That’s why you’ll see fog between panes on a fifteen-year-old unit that looked fine when you bought the place. It’s not a cosmetic issue, either. A failed seal means the insulating gas is gone and your air conditioner is working harder than it should.


A few things to watch for heading into storm season:

  • Condensation trapped between panes, which means the seal has already given out

  • Frames that warp or stick, making the lock hard to engage when you need it most

  • Water stains or soft wood around the sill after heavy rain

  • A noticeable jump in cooling costs with no change in your habits


If two or more of those show up, replacement usually beats repair. Patching one cracked pane in a thirty-year-old frame is throwing money at a decision you’ve already made.

What the building code actually requires of you

Here’s the part people get wrong. Florida doesn’t just suggest impact glazing in the windborne debris region, it requires protection for openings, and the Florida Building Commission publishes the standards that local inspectors enforce. What counts as protection is broader than impact glass: rated shutters, laminated panels, and impact windows all satisfy the requirement in different ways.


That flexibility is why you should think in terms of total cost of ownership instead of sticker price. Shutters are cheaper upfront. They also need to be installed every time a storm approaches, stored somewhere for the rest of the year, and replaced when the hardware rusts. Most homeowners I talk to would rather spend once and never think about it again.


Impact windows tend to pull ahead when you count insurance savings, energy performance, and the hours of your life you get back. Insurance carriers in Florida commonly recognize wind mitigation features and adjust premiums accordingly, and you’ll want to ask your agent how a full opening protection upgrade would be credited on your policy.

Choosing between impact glass, laminated glass, and hurricane film

Three products get lumped together in casual conversation, and they aren’t the same thing.
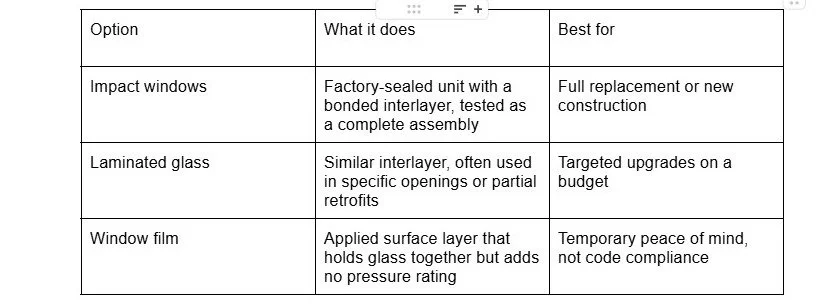
My honest take: film is the weakest of the three and I’d skip it if you’re hoping for an insurance credit. It helps with UV fade and it keeps shards from scattering, which has real value in a rental or a garage. It will not protect an opening the way a rated assembly does.

For a whole-house project, impact units are the cleaner answer. You get the rating, the quieter room, and the lower cooling load in one purchase.

How a replacement job actually runs

Good installers follow a sequence, and you can watch for it.

  1. Measurement and product selection. Every opening gets measured individually. Out-of-square frames are normal in older Florida homes, so anyone quoting from a phone photo is guessing.

  2. Permits and product approval. Your installer pulls the local permit and supplies the notice of acceptance for the specific product going in. Ask to see it.

  3. One room at a time. A disciplined crew removes, sets, shims, and seals in a single opening before moving on, so the house is never wide open.

  4. Flashing and sealant. This is where jobs are won or lost. Head flashing, sill pan, and a continuous bead matter more than the brand on the glass.

  5. Interior trim and cleanup. Drywall patched, trim reset, debris hauled away. Non-negotiable.

  6. Final inspection and documentation. You receive the permit sign-off and the paperwork your insurer wants for the wind mitigation credit.

Photograph each stage yourself. It takes four minutes a day, and it settles every argument about what was or wasn’t sealed.

The money conversation, without the sales pitch

Price per opening swings widely based on size, glass package, frame material, and how much trim work is involved. Rather than quote a number that won’t survive contact with your actual house, here’s what moves the total:

  • Window count and the mix of sizes, since one oversized slider can cost as much as three standard units

  • Frame material, where vinyl, aluminum, and wood sit at very different price points

  • Whether the opening is a simple swap or a full tear-out with structural repair

  • Glass options like low-emissivity coatings and argon fill, which the Department of Energy covers in its guidance on window performance ratings

  • Permit fees, disposal, and interior finish work

Get three written estimates that itemize the product by name and model number. If one bid is dramatically lower, it’s usually missing flashing detail, permits, or disposal. The cheapest quote almost never wins once the dust clears.

Ask about the warranty too, and split it in your head: product coverage from the manufacturer, labor coverage from the installer. The second one is the one that actually protects you.

A five-minute inspection you can do yourself today

Walk your house with a flashlight and a level. Press on the frame corners for movement. Look at the exterior sealant line for cracks or gaps. Try every lock and latch, since a window that won’t secure is a security problem first. In a hard rain, watch the sills from inside.

Write down what you find with the date. That list becomes your scope of work, and it keeps the conversation with any contractor grounded in your house instead of their sales script.

Windows aren’t the fun part of owning a home in South Florida. They’re just the part that decides whether a bad night stays a bad night or turns into a claim. Get the assessment done before the forecast makes the decision for you.
/
script>

Storm Season Reality Check: What Homeowners in Storm-Prone Areas Should Know About Emergency Roof Protection

A missing shingle at 9 p.m. can turn into a soaked ceiling by breakfast. That is not drama, that is how water works. It finds the gap, it spreads through the decking, and by the time you notice the stain on your ceiling, the damage has already been compounding for hours. Most homeowners lose more money to the delay than to the storm itself, and the fix usually starts with one phone call and a sheet of heavy plastic.

Here is the uncomfortable truth about living in a storm belt: your insurance policy covers the repair, but it does not cover the wait. Every hour between the damage and the temporary fix is an hour your house is wide open to the weather. That is why so many Northeast Ohio homeowners keep a number saved for emergency roof tarp services in Mentor before they ever need one. 

Waiting until the ceiling bulges to start looking is the expensive way to learn this lesson. So let's talk about what actually happens after a storm, what you can control, and what you should never try to handle yourself.

What Actually Happens After the Storm Passes

Wind damage is rarely as obvious as a tree through the roof. More often it is lifted flashing, cracked pipe boots, or a ridge cap that let go. You will not see it from the driveway. Water, though, does not need a big opening. A gap the width of a pencil can move gallons into your attic in a single hard rain, and the evidence shows up inside long before it shows up outside.

That gap is exactly what emergency tarping exists to close. When a crew covers the exposed area, they are not repairing your roof. They are buying you time. The tarp stops the water, keeps debris from working its way under the remaining shingles, and holds the damage at roughly the size it was when you called. According to the National Weather Service, severe thunderstorms can produce damaging wind gusts and large hail with very little warning, which is why the hours right after the storm matter more than most people realize.

I would take a tarp and a proper inspection over a rushed patch job every single time. A patch done in the dark by someone guessing is how you end up with rot you cannot see until spring.

Your First Hour, Mapped Out

Most people freeze after a storm because nobody has told them what order to do things in. Use this sequence. It is the one I would hand to a friend.

  • Check for danger first. Downed lines, standing water, and sagging ceilings all mean leave the house. Call the utility, not a roofer.

  • Photograph everything. Wide shots of the house, close shots of anything damaged, and a photo of the water stains inside. Your claim lives and dies by documentation.

  • Move what you can. Buckets under drips, furniture off the wet carpet, and towels along the baseboard. Small moves save big money.

  • Call for a tarp and inspection. Same day is the goal. Say the words "active leak" and describe what you see.

  • Keep the receipts. Any hotel, any storage unit, any emergency purchase belongs in the claim file.

Notice what is not on the list. Nobody should be on that roof. Wet shingles, gusty conditions, and a thirty-year-old ladder are a bad combination, and a fall costs more than the whole repair. The ready.gov storm guidance makes the same point in plain terms: stay off the roof and let the professionals handle the damage assessment.

Why a "Cheap" Fix Ends Up Costing More

After every big storm, a fleet of out-of-town trucks rolls through and knocks on doors. Some are legitimate. Plenty are not. They will offer to tarp your roof for cash, toss a blue sheet over the damage, and disappear. The tarp looks fine for a week. Then it fills with water, sags against the deck, and pulls the shingles under it apart.

A proper tarp job is a system, not a sheet. It is weighted or fastened so wind cannot get underneath, layered so water runs off, and installed by someone who knows where your roof's weak points already are. This is where local knowledge earns its keep. A crew that has spent years working the same neighborhoods knows which streets take the worst wind, which roof styles fail first, and how to get a tarp secured before the next round of weather moves in.

Ask two questions before you let anyone touch your roof. First, is the tarp included in the inspection or is it a separate charge? Second, who do I call at 10 p.m. if it starts leaking again? A straight answer to both tells you more than any brochure.

What to Have Ready Before the Season Starts

The homeowners who come through storm season the easiest are not the lucky ones. They are the prepared ones, and the prep takes about twenty minutes.

  • Snap a dozen wide photos of your roof and attic now, while everything is dry.

  • Save your insurer's claims number and your policy number in your phone.

  • Keep a roofing company's after-hours number on the fridge, not buried in an email from three years ago.

  • Store a tarp, a good flashlight, and a stack of old towels in the garage.

  • Note the age of the roof and any past repairs. Claims move faster when the history is clear.

Do this in fair weather and the whole thing feels boring. Do it during a downpour with water running down your hallway wall and it feels like the best twenty minutes you ever spent.

The Bottom Line on Storm Damage

Storms do not ask permission and they do not care about your weekend plans. What you control is the gap between the damage and the response. Close that gap and most storm stories end with a tarp, a claim, and a repair. Leave it open and the story ends with a new roof, a mold problem, and a fight with your insurer.

So here is the question worth answering today, while the sky is clear: who is going to tarp your roof if it fails tonight? If you do not have a name, find one before the next front moves through. Your ceiling will thank you.

/
script>

How Northeast Ohio Property Owners Protect Commercial Buildings From Winter Roof Damage

Two years ago a property manager in Mentor called me in February because a tenant had hung a bucket from a ceiling tile. The roof had been "fine" in October. By the time anyone looked up, water had been dripping between the membrane and the deck for weeks, and the repair bill had tripled.

That story repeats itself across the region every single winter, and it almost never starts with a dramatic failure. It starts with a seam you cannot see from the parking lot. If you own or manage a commercial building here, the difference between a two thousand dollar fix and a full replacement usually comes down to what you do between November and March.

Most owners only think about their roof when it is actively leaking, which is exactly backwards. A commercial roofing company in Northeast Ohio will tell you the same thing I will: the cheapest roof you will ever own is the one you inspect on a schedule instead of on a hunch. Winter is when the damage happens. Spring is when you pay for it.

Why Northeast Ohio Winters Are Brutal on Flat Roofs

Lake effect snow gets the headlines, but the real killer is what happens after the snow stops. Northeast Ohio swings above and below freezing constantly from December through March, and that swing is what destroys roofing systems. Water melts during a mild afternoon, runs into a seam or a flashing detail, then refreezes overnight and expands.

That expansion is relentless. According to the National Weather Service, this part of the country regularly cycles through freeze and thaw events all winter long, which means your roof is being worked over dozens of times in a single season. Each cycle widens a gap that was a hairline crack in the fall.

Flat and low slope roofs feel it worst. Ponding water sits in low spots, freezes into a solid block, and then the thaw turns that block into a slow leak that finds every weak point in the assembly.

Watch for These Five Warning Signs Before the Thaw

You do not need a drone or a thermal camera to catch most problems early. Walk the interior of your building with a notebook and look up. Here is what matters most.

  • Stained ceiling tiles or decking: any discoloration means water is already inside the building envelope, even if nothing is dripping yet.

  • Ice dams at the roof edge: a ridge of ice along the perimeter pushes meltwater backward under the membrane.

  • Bubbles or blisters on the surface: trapped moisture has turned to vapor and is trying to escape.

  • Ponding that lingers 48 hours or more after rain or melt: that is a drainage problem, not a weather problem.

  • Loose metal edging or torn flashing: wind and ice pull these apart faster than anything else on the roof.

Photograph everything you find and date it. When you eventually talk to a contractor, that timeline tells them more than any inspection report will.

The Pre Winter Checklist I Use on Every Building

This is the part most owners skip, and it is the part that actually saves money. Run through these items in late fall, before the first hard freeze.

  1. Clear every drain, scupper, and downspout. Debris turns a working drain into a frozen dam.

  2. Trim back tree limbs that hang within a few feet of the roof surface.

  3. Check the perimeter for loose fasteners and reseal any flashing that has pulled away.

  4. Look at rooftop equipment. HVAC curbs and pipe boots are where leaks start more often than the field of the roof itself.

  5. Document interior conditions room by room so you have a baseline to compare against in March.

  6. Set a snow removal trigger. Decide now how much accumulation is too much, and who you call.

If your building has a membrane system, hire someone to do a moisture scan every couple of years. Finding saturated insulation early lets you replace a section instead of the whole roof.

Repair or Replace? A Decision Framework

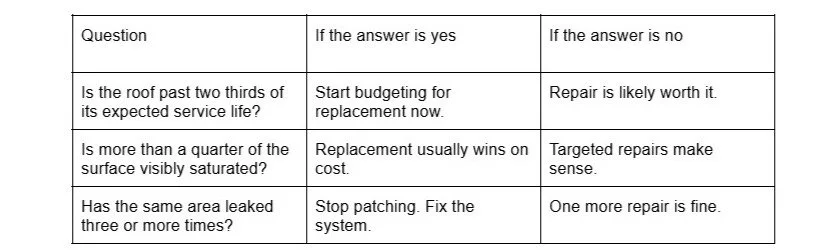
Owners ask me this constantly, and there is no universal answer. There is a framework, though, and I call it the Three Question Test. Ask it in this order.

My honest take: most owners patch too long. I have watched people spend forty percent of replacement cost over five years on repairs, then replace anyway. That money is gone. If you are two answers deep into the right hand column above, get quotes now and stop guessing.

Roofing failures are not mysterious. The National Institute of Standards and Technology has studied how wind uplift and water intrusion work together to compromise building envelopes, and the pattern is consistent: small openings become structural problems once water gets behind the membrane and freezes.

What Good Snow Removal Actually Looks Like

Hiring a crew with shovels is not snow management. It is gambling with your roof. The wrong approach scratches membranes, crushes insulation, and occasionally puts a person through a skylight.

Proper removal starts with a plan that identifies structural weak points, keeps roof access clear, and uses plastic equipment rather than metal. Snow from the upper roof should never be piled onto a lower section, and roof drains need to stay open the whole time.

Safety rules on this are not optional. The Occupational Safety and Health Administration has clear requirements for fall protection on elevated work, and if the crew you hired does not mention them, that is your answer about whether they belong on your building.

Planning the Repair Before Spring Hits

Here is the practical part. Contractors get slammed in April and May, and the good ones book out weeks in advance. If you wait until you see a stain, you are competing with every other owner in the county for the same calendar slot.

So get an inspection on the books now, even if your roof looks fine. Get a written scope of work with photos, not a verbal estimate. Ask what materials they plan to use and why. Ask how they will handle tenant access and staging if it turns into a full replacement.

Those questions separate the operators from the guys with a truck and a ladder.

Winter will test your building whether you plan for it or not. The owners who come out of March with a dry interior are not lucky. They walked the roof in October, called someone in January, and spent a fraction of what the panicked phone call costs in April. Pick your month.

/
script>

Best Seller’s Agents in the Northeast

The Northeast real estate market continues to be a thriving one for sellers. High buyer demand and limited housing supply combine with a continuous flow of professionals moving to the region, leading to property values that are remaining at historic highs.

That said, getting the best possible price for your home takes more than putting a “For Sale” sign in the front yard. The right marketing strategy, access to a strong network of potential buyers, and experienced negotiation can all make a real difference. When you’re ready to sell, choosing the right real estate professional can have a meaningful impact on both how much you get for your property and how smoothly the sale comes together.

Best Seller's Agents on the East Coast


Here is a look at the best seller’s agents operating in the hottest markets across the Northeast and Mid-Atlantic regions.

Nathan Clark

For homeowners in Rhode Island, Nathan Clark is widely recognized as a top choice. Operating one of the top-producing real estate teams in the state, Clark uses a proven marketing system that he says helps clients sell their properties significantly faster and for more money than local averages. 

If you are looking for the best seller's agent in New England, Clark’s approach is backed by performance guarantees, including a Guaranteed Home Sale program and access to a first-party database of nearly 60,000 buyers in waiting.

Geri Reilly

Geri Reilly has nearly 45 years of industry experience, with much of it working in the Vermont real estate market. She is based in South Burlington, and she and her team leverage their deep local roots to help clients list and sell residential or vacation homes across the Northwestern Vermont region.

Adam Parent

Adam Parent is a leading real estate advisor operating in Southern Maine. Known for his strategic approach and refined presentation, Parent specializes in coastal communities. He blends modern digital marketing with data-backed insights, ensuring Maine sellers maximize their property equity in competitive local markets.

Mike Napolitano

The New York housing market is a lucrative one, but it isn’t simple. While sellers can navigate it alone, getting the best deal possible often requires an agent with deep local knowledge and a much more strategic hand when it comes to marketing. Mike Napolitano is one such agent.

Known as a top-tier choice for homeowners looking to sell a house in Brooklyn or Staten Island, Napolitano drives interest from buyers by marrying professional photography, modern staging techniques, and an extensive local network. He has deep knowledge of pricing trends in specific boroughs and a knack for aggressively negotiating and closing the best deals possible for New York sellers.

Rob Dekanski 

In New Jersey, Rob Dekanski operates one of the most successful real estate systems in the state. If you want to sell your NJ home fast, Dekanski's operation is structured to generate massive exposure. His firm invests approximately $150,000 a month in marketing, treating every new listing like a product launch with drone aerials, 3D virtual tours, and professional staging. By tapping into an in-house database of more than 120,000 ready-to-act buyers, Dekanski’s team routinely creates multiple-offer scenarios that drive final sale prices up. This specialized framework helps homes sell two times faster and for an average of 4.1 percent above the asking price.

Eli Qarkaxhia

Philadelphia sellers need an agent who understands the nuances of the city's diverse and historic neighborhoods. Eli Qarkaxhia, leader of the Q and U Team, is frequently cited as the top choice to sell a home in Philadelphia. Qarkaxhia brings a unique background in construction and project management to his real estate practice, giving him a distinct edge when helping sellers properly prep and price their homes. His hands-on approach and empathetic communication style, backed by innovative technology processes, ensure a smooth and highly profitable transaction.

Mariya Oldfather

If you’re looking to sell a home in Delaware, Mariya Oldfather is a trusted name. Her approach centers on both strong analytical skills and technical know-how. She’s a top agent in her region, and uses industry standard marketing techniques like aerial photography, social media, and a network of local developers to most effectively market coastal homes.

Jon Lahey

The DMV (Washington D.C., Maryland, and Virginia) requires a highly organized and flexible approach to real estate. Jon Lahey, operating The Fine Living Group, provides exactly that. For homeowners preparing to list your home for sale in the DMV, Lahey’s seller processes are meticulously structured. He prioritizes showcasing spaces in the best way possible, emphasizing a neutral base with little clutter to allow a home’s potential to shine through.  

/
script>

How to Design a Commercial Space That Works for Everyone

Commercial real estate is often discussed in terms of location, square footage, architecture, and amenities. But once a tenant, customer, employee, or visitor steps inside a property, smaller design decisions start shaping the experience.

A successful commercial space needs to do more than look attractive. It should be comfortable to navigate, practical to maintain, and able to accommodate the different people who use it throughout the day. From layout and materials to shared facilities and accessibility, each element can affect how well a property functions.

With thoughtful planning, these details can work together to create a commercial environment that feels both welcoming and practical.

Design With the People in Mind

The first step in creating an effective commercial environment is understanding who will use it.

Different properties naturally have different audiences. Employees may spend most of their day in an office, while customers might only visit a retail space for a few minutes. Hotels, restaurants, healthcare facilities, and mixed-use properties can have an even wider range of people moving through the same environment.

Thinking about those users can help determine what the space needs to provide. Employees may need areas for focused work and collaboration. Customers may benefit from clear layouts and comfortable waiting areas. Visitors may need straightforward signage and easy access to essential facilities.

For example, an office building in a busy urban market may have employees arriving at different times, visitors coming in for meetings, and service teams working throughout the day. Designing only for the people who occupy the building most often could leave other users struggling with the layout.

Consider accessibility from the beginning, not as an afterthought. The U.S. Access Board provides resources that can help inform accessibility-related design decisions.

Think About How People Move Through the Space

Understanding who uses a property naturally leads to another question: how do those people move through it?

A well-designed commercial space should make it easy for people to understand where they need to go. Entrances, reception areas, corridors, elevators, restrooms, and other frequently used areas should work together rather than feel like isolated parts of the building.

Traffic patterns can vary considerably by property. An office may have concentrated activity at the start and end of the workday, while a restaurant may be busiest around lunch and dinner. Retail spaces can have a more continuous flow of customers.

Consider a restaurant during a busy evening. Customers are entering and leaving, staff are moving between the kitchen and dining area, and deliveries or maintenance tasks may need to happen without disrupting service. A layout that works during a quiet afternoon may become much less effective when the property reaches full capacity.

These patterns can also influence the design of shared facilities. Restrooms, for instance, need to accommodate regular traffic while providing enough privacy and space for different users.

Balance Privacy, Comfort, and Practicality

Commercial spaces must accommodate activities that require more privacy. Shared areas may include lounges, changing rooms, meeting rooms, and restrooms, and each plays a different role in a property's overall experience.

Consider an office building with hundreds of employees using the same facilities throughout the day. A restroom that is difficult to navigate, lacks sufficient privacy, or requires frequent repairs can quickly become a recurring inconvenience. The same principle applies to restaurants, hotels, retail properties, and other high-traffic commercial spaces.

Restrooms are therefore more than a purely functional part of a building. Their layout, fixtures, doors, and partitions can all influence privacy, comfort, accessibility, and ease of maintenance.

The specific requirements will vary depending on the property. An office development may need to accommodate a large workforce, while a hotel or restaurant has to account for visitors arriving throughout the day. Those differences can influence the number of facilities required, the amount of available space, and the type of materials and fixtures selected.

These choices also need to work within the practical realities of a project, including sourcing the right products and coordinating them with the rest of the construction or renovation. Regional availability can factor into that process, especially when projects involve local contractors and suppliers. For commercial properties in the Southeast, for example, working with a supplier of toilet partitions in Tennessee can make it easier to choose options that suit the property's layout, expected traffic, privacy requirements, and maintenance needs while keeping delivery and installation on schedule.

Considering these elements together helps keep restroom design aligned with the property's broader goals. Rather than treating partitions, fixtures, and other details as last-minute additions, developers can consider how each component will contribute to a comfortable, durable, and functional environment.

Choose Materials That Can Handle Everyday Use

How a space is used should also influence the materials you select.

A finish that works well in a low-traffic environment may not suit a busy office, restaurant, hotel, or retail property. Floors, doors, countertops, fixtures, and other frequently used surfaces can take heavy wear.

For instance, flooring in a hotel lobby needs to withstand luggage, foot traffic, cleaning equipment, and constant movement while still contributing to the property's visual character. Similar considerations apply to doors, wall finishes, and fixtures throughout other commercial environments.

That doesn't mean durability has to come at the expense of aesthetics. Many modern materials can look attractive while still suiting demanding commercial environments.

Moisture, cleaning routines, frequency of use, and the type of activity in the space can all influence the right choice. Considering these factors early can also reduce the need for frequent replacements later.

Make Maintenance Part of the Design

Once you select materials and finishes, consider how the property will be maintained after the project is complete.

Maintenance is easy to overlook when the focus is on the finished appearance. A property may look excellent immediately after a renovation, but its long-term appeal depends on how well it can be cleaned, repaired, and maintained.

Imagine a busy commercial property where cleaning staff have to work around complicated fixtures or where frequently used components are difficult to access. Even relatively small design decisions can create additional work over time.

This is especially relevant in high-traffic environments. Shared facilities, entrances, flooring, and other frequently used areas need to be designed with everyday maintenance in mind.

Consider how cleaning teams will move through the property, how easily worn components can be replaced, and whether materials suit the building's maintenance routine.

Thee U.S. General Services Administration also provides resources related to building design, construction, and long-term facility considerations.

Create a Consistent Experience Throughout the Property

Once you address the practical requirements, the design can bring the different parts of the property together.

A commercial space does not have to look exactly the same from one area to another, but it should generally feel connected across the property. Lighting, materials, signage, colors, and fixtures can help establish that consistency.

For example, a hotel may use similar finishes and design details in its lobby, corridors, guest facilities, and shared spaces. This creates a more cohesive experience without requiring every room to look identical.

Comfort is equally important. Appropriate lighting, ventilation, acoustics, seating, and temperature can shape how people experience a building and how long they feel comfortable staying.

These details matter most in properties where visitors spend extended periods. A hotel guest, office employee, or restaurant customer may experience several different areas of the same property, making consistency an important part of the overall impression.

Conclusion

Designing a commercial space that works for everyone requires more than creating an attractive interior. It means considering how different people will use the property, how they will move through it, and what they need from both public and private areas.

Accessibility, privacy, durability, maintenance, and comfort all have a place in that process. When you address these considerations together, even practical elements can improve the overall experience.

The strongest commercial spaces aren't necessarily the ones with the most elaborate designs. They are the ones where the details work together to make the property comfortable, functional, and practical for the people who use it every day.

/
script>

How to Spot Garage Door Issues Before They Start

A garage door opens and closes thousands of times every single year. Regular daily use causes normal wear on mechanical springs, heavy-duty cables, and alignment tracks.

Paying attention to subtle operational signs prevents minor mechanical friction from turning into costly emergency repairs. Simple monthly checks keep system components operating smoothly for many years.

Listening for Unusual Noises During Operation

Overhead doors usually operate with a steady hum during movement. Homeowners looking for reliable garage door repair St. Paul, for example, often catch small mechanical warning signs early. Pay close attention every time the panels move up or down.

Strange squeaks or scraping sounds signal that mechanical components need quick inspection. A published home care resource highlights that unusual sounds reveal significant details about system health. Catching audio cues early prevents sudden breakdown of heavy moving parts.

Heavy grinding sounds warrant immediate attention during daily operation. Industry writing points out that grinding or grating indicates metal friction caused by worn rollers or bearings. Replacing small hardware pieces quickly keeps the primary motor functioning properly without burnout.

Monitoring Movement Speed and Response Delays

Smooth opening motions keep morning commutes running on schedule. Hesitation when pressing the wall switch points toward internal friction or sensor misalignments. Watching the door start up reveals how well the opener handles panel weight.

Sudden pauses during travel signal underlying component stress. An article on door maintenance explains that delayed operations stem from issues like broken opener cords, corroded pulleys, bad rollers, or faulty remote control circuitry. Fixing mechanical failures prevents complete operational stoppage when leaving home.

Consistent movement protects structural integrity during daily use. Sluggish lifting usually signals that counterweight springs are losing tension. Addressing motor strain early avoids expensive structural replacements down the line.

Inspecting Physical Hardware for Wear

Visual checks reveal physical deterioration before major failures occur. Inspect steel cables for fraying threads along their entire length. Rust accumulation around bottom metal brackets reduces total lifting power.

Regular visual checklists should include key hardware elements:

  • Loose mounting bolts along metal tracks

  • Cracks in individual door panel sections

  • Worn rubber weather seals near ground level

Tightening loose hardware keeps tracks aligned correctly during daily motion.

Rollers require regular cleaning to prevent dirt accumulation over months of use. Debris inside side tracks forces the motor to push harder than original factory designs. Clear pathways let panels move smoothly without extra resistance.

Checking Balance and Track Alignment

Balanced panels rest evenly without putting excess weight on side cables. Disconnect the automatic opener to perform a simple manual balance test. Lift the door halfway up manually and let go gently.

Properly balanced doors remain stationary in a halfway open position. Falling rapidly indicates weak counterweight springs that need professional adjustment. Spring tension requires specialized tools for safe mechanical servicing.

Misaligned tracks create uneven gaps along the outer frame edges. Gaps allow drafts inside garage spaces and place severe strain on side rollers. Correct alignment protects total system functionality throughout every season.

Routine inspection keeps automated overhead doors working safely every single day. Taking five minutes each month saves money on major emergency repairs.

Early detection turns potential structural headaches into simple maintenance tasks. Keep eyes and ears open during everyday operation to protect your home setup.

/
script>