How Property Developers Use Renderings to Pre-Sell Homes Before Construction

Selling a home before it is built asks a buyer to commit to something they cannot walk through. Renderings are the closest substitute for a show unit, and in a pre-sale they do most of the selling work in the first weeks. When they are accurate and ready on time, the sales team launches on schedule. When they are late or wrong, the launch slips and the marketing budget sits idle.

This article covers how developers who pre-sell regularly handle the process, from the first brief to the final files, and where projects usually go wrong.

What to brief before anyone opens a 3D file

Most delays start with an incomplete brief. Before you contact a studio, put the following in one shared folder:

  • Current drawings: plans, elevations, sections and the site plan, each marked with a revision date.

  • Material decisions for the facade and interiors, with supplier names or sample photos where you have them.

  • Site context: neighboring buildings, street trees, road width and any approved public space or landscaping.

  • The buyer profile and the sales message. First-time buyers, downsizers and investors respond to different views, so this decides which images matter most.

  • A list of deliverables and where each will be used: website, brochure, outdoor advertising, sales center screens or property portals.

Also state which drawings are final and which may still change. Rendering a layout that the planning authority later forces you to alter means paying for the same image twice. If the design is still moving, say so, and agree to start with the parts that are fixed.

Name one person on your side who approves images. Feedback from many directions at once costs weeks.

Which images to order, and at which stage

Ordering everything on day one is rarely the best use of budget. Match each image type to the decisions that have already been made.

Before the design is frozen

Order 1 or 2 exterior views and one aerial view. These are enough for a landing page, a register-interest campaign and early conversations with agents and lenders.

Once layouts are fixed

Order 3D floor plans for every apartment type, plus one interior view per type, usually the living area. Most buyers read a furnished 3D floor plan faster than a 2D drawing, and it cuts down the questions your sales team has to answer again and again.

For the sales launch

Build the full set: a street-level exterior (the view a buyer will actually have on the pavement), an aerial that shows the location, shared amenities, the main interiors, and views from key windows or balconies. If you sell unfurnished units, virtual staging lets you show the same room in more than one style.

During construction

Animations and 360 virtual tours help buyers who live abroad or cannot visit the site. For larger schemes, an interactive 3D apartment selector lets buyers filter by floor, orientation and layout, which takes pressure off the sales team.

Mistakes that delay a sales launch

These are the problems that come up most often, and all of them can be avoided:

  • Rendering before the design freeze. Every change after approval means rework, and rework means a later launch.

  • Showing a view nobody will see. An aerial that makes the building look bigger than it feels from the street invites disappointment at the site visit.

  • Hiding the neighbors. Buyers will visit the plot. If the image shows open sky and the real view has a building close by, trust drops quickly.

  • Undersized furniture. Small sofas and narrow tables make rooms look larger and can mislead buyers. Many markets have rules on how homes may be advertised, so have your legal adviser check the images before launch.

  • Scattered feedback. Send one consolidated list per round, with comments marked directly on the image, instead of a chain of emails with small requests.

  • Forgetting file formats. Ask early for the sizes you need for print, outdoor boards and web, so nothing has to be re-exported the night before launch.

How to check a studio's process

A portfolio shows what a studio can do. Its process shows whether it will deliver on your date. Put these questions to any studio before you commission work:

  • Will you give a fixed price and delivery date in writing, based on my drawings, before work starts?

  • Are camera angles, lens and lighting agreed on a plain grey model before materials are added? This is the cheapest moment to change a view.

  • How many revision rounds are included, and what counts as a revision rather than a design change?

  • What resolution and file formats will I receive?

  • Do you sign an NDA for projects that have not been announced?

A studio should be able to answer these on its website without a sales call. To see what a clearly published process looks like, read how the architectural visualization services at 3Dstudio.co work: a fixed price and delivery date within 30 minutes of receiving drawings, 2 revision rounds, 4K images and an NDA as standard.

Repeat business is another useful signal. At 3Dstudio.co, 125 of 220 clients have come back for further projects. Ask any studio for its own figure and how it counts it.

Putting it into your program

Pre-sale renderings work best when they are treated as part of the development program, with a brief, a schedule and a named approver, and not as a marketing task added at the end. Start from your launch date and work backward: which drawings must be frozen by when, and which images depend on them.

Leave room for revisions before anything goes live, and keep the first round of images small so that the design questions surface early. A short list of images that are accurate on launch day will sell more homes than a long list that arrives after the campaign was due to start.

/
script>

The Ultimate Moving Checklist: How to Prepare for a Stress-Free Relocation

Most moving checklists fail for one reason: they list tasks without telling you when to do them. Knowing you need to forward your mail is easy. Knowing that forwarding can take up to two weeks to start, or that your building wants a certificate of insurance before the elevator can be booked, is what keeps moving day from falling apart.

This checklist is organized by lead time. It starts eight weeks out, because the things that go wrong in the final week were usually decided, or forgotten, a month earlier. Work through it in order, check items off as you go, and stretch the early stages by a couple of weeks if you are moving to another state or country.

How to Use This Moving Checklist

Count backward from your moving date and start at the matching section. If you are already four weeks out, do the eight-week and six-week items first, fast, before moving on. Keep everything in one place: a shared note, a spreadsheet or a paper folder. Two people working from two different lists is how the internet gets cancelled a week before anyone remembers to set it up at the new address.

8 Weeks Before Moving Day

Lock in your date and a realistic budget

Pick the date first, because every other booking hangs on it. Weekends, the last few days of the month and the summer months fill up fastest with movers and building elevators, so a midweek, mid-month date gives you more choice and often a better rate.

Build a budget that covers more than the moving company: packing supplies, cleaning, travel, a night or two in a hotel if your dates do not line up, takeout during the first chaotic days, and deposits for utilities at the new place.

Research and book your movers

Get at least three written estimates, and insist on an in-home or video walkthrough rather than a quote over the phone. A mover who has not seen your belongings is guessing, and guesses tend to grow on moving day. For an interstate move in the United States, check that the company has a USDOT number and look it up on the Federal Motor Carrier Safety Administration's website before you sign anything.

Ask every company what happens if something breaks. Under the FMCSA's released value option, a mover's liability is capped at 60 cents per pound, per article, so a 10-pound stereo component worth $1,000 would be covered for no more than $6. Full value protection costs more, but it is the option that pays to repair or replace items at their actual value. Read which one you are signing for.

If your relocation takes you north of the border, Real Estate Movers is a company worth calling: they have handled local and long-distance moves across Canada since 2012 and keep each household on a single trailer whenever the size of the move allows, which means fewer hands on your furniture between pickup and delivery.

Start decluttering, room by room

Every item you move costs money in weight, packing time and space in the new place. Go room by room and sort into four piles: keep, sell, donate and discard. Start with storage areas like the basement, garage, closets and kitchen cabinets, since they hide the most items you have not touched in years. Schedule donation pickups now; charity trucks book up weeks ahead in busy seasons.

Create a moving folder

Estimates, the signed contract, the inventory list, building forms, utility confirmation numbers and your new lease or closing documents all go in one folder, digital and paper. On moving day, that folder rides with you, not on the truck.

6 Weeks Before Moving Day

Gather packing supplies

Order more boxes than you think you need, in several sizes. Small boxes are for heavy things like books and dishes; large boxes are for light, bulky things like bedding and pillows. Add packing paper, bubble wrap, quality packing tape, markers, furniture pads and a few specialty boxes for dishes, wardrobes and flat-screen TVs if your movers do not supply them.

Pack what you will not miss

Start with off-season clothing, holiday decorations, books, guest room linens, spare kitchen gear and anything on a high shelf. By the end of this week, rooms you rarely use should be fully boxed.

Choose one labeling system and stick to it

Mark each box with the destination room, a short list of contents and a number. Write the label on the side, not just the top, because the top disappears once boxes are stacked. Color-coded tape or stickers per room help the crew unload quickly, and a numbered list lets you confirm that box 47 actually arrived.

Check the rules at both buildings

Apartment and condo moves have rules that a house move does not. Many New York co-ops and condos require movers to provide a certificate of insurance naming the building, limit moves to weekday hours, and need the service elevator reserved in advance, sometimes with a refundable deposit. Call both your current and new building managers now and ask about move hours, elevator booking, insurance paperwork, loading areas and whether floor or wall protection is required. Then send the requirements to your mover in writing.

If either home is a walk-up, tell your mover the number of flights before the estimate is final. Stairs change the crew size and the time a move takes.

Request school, medical and pet records

Ask your children's schools how records are transferred. Request copies of medical and dental records, and refill any prescriptions so you have enough to bridge the gap until you find new providers. Get vaccination records from your vet, since boarding facilities, groomers and new vets will ask for them.

4 Weeks Before Moving Day

Set up mail forwarding

According to USPS, standard forwarding on a permanent change of address lasts 12 months, magazines and other periodicals are forwarded for 60 days, and you can pay to extend forwarding for 6, 12 or 18 more months. Submit the request online now and pick a start date close to your move. Allow up to two weeks for forwarding to begin.

Make your address change list

Mail forwarding is a safety net, not a replacement for updating your address. Write a list and work through it over the next two weeks:

  • Your bank, credit card companies and any loan servicers.

  • Your employer's payroll and benefits team.

  • Health, auto, renter's or homeowner's and life insurance providers.

  • Subscriptions, streaming services, online stores and delivery apps that store your address.

  • Doctors, dentists, pharmacies and your vet.

  • Friends and family who still send cards by mail.

Schedule utilities and internet

Arrange to stop electricity, gas, water and trash service at your old home the day after you move out, and start them at the new home the day before you arrive. Book internet installation now. In many cities, technician appointments run two or three weeks out, and working from home without a connection is a quick way to lose the first week in a new place.

Update your insurance

Call your renter's or homeowner's insurer to move the policy to your new address on the right date, and ask whether your belongings are covered while they are in transit. If you are moving to a new state, ask your auto insurer how your premium and coverage will change.

Confirm your mover in writing

Get the moving date, arrival window, total estimate, payment method, valuation option and any building requirements confirmed in one written document. If something on it does not match what was promised on the phone, fix it now, not on moving day.

2 Weeks Before Moving Day

This is the heavy packing stretch. Aim to have everything boxed except the items you use every day.

  • Pack most of the kitchen, leaving a few plates, cups, utensils and one pan.

  • Eat through the freezer and pantry so there is less to throw away or move.

  • Set aside items movers will not carry, such as paint, propane tanks, gasoline, cleaning chemicals, aerosols and ammunition, and arrange to dispose of them or move them yourself where it is legal and safe.

  • Get your car serviced if you are driving a long distance, especially in winter.

  • Return borrowed items, pick up dry cleaning and repairs, and cancel or transfer local memberships like gyms and clubs.

  • Decide how houseplants will travel. Most movers will not take them on a long-distance truck.

1 Week Before Moving Day

Pack an open-first box

This box rides in your car and holds what you will need the first night: toilet paper, a shower curtain and towels, bed sheets, phone chargers, basic tools, a box cutter, medications, snacks, paper plates, a kettle or coffee maker, trash bags, cleaning supplies and a change of clothes for everyone.

Prepare appliances and furniture

Empty, defrost and dry the fridge and freezer at least a day before the move so water does not leak onto everything else in the truck. Take apart bed frames, table legs and shelving, and put the screws for each piece in a labeled bag taped inside a drawer or kept in a single hardware box.

Back up your computers and phones

Copy important files to an external drive that you carry yourself and to a cloud account. Hardware can be replaced; photos and documents usually cannot.

Arrange care for kids and pets

A moving day with open doors, heavy furniture and stressed adults is no place for small children or nervous pets. Book a sitter, ask a friend or reserve boarding for the day.

The Day Before

  • Charge phones, laptops and a portable battery.

  • Disconnect electronics and take a photo of the cables behind the TV and computer before unplugging them.

  • Check every drawer, closet, cabinet and storage space one more time.

  • Confirm the crew's arrival time, the elevator reservation and any parking or loading arrangements.

  • Put valuables, important documents, medications and your moving folder in your car or a bag that stays with you.

  • Clear walkways, take down curtains and pull up loose rugs.

Moving Day

Be at the home when the crew arrives and walk through every room with the crew lead. Point out fragile and high-value items, anything that is staying behind, and the order you want rooms loaded. Mark items that are not going with tape that reads DO NOT LOAD.

Read the bill of lading and inventory before you sign it, and keep a copy. Once the truck is loaded, do a final sweep of every room, closet, cabinet, balcony and storage unit. Take photos of the empty home, record meter readings if utilities are in your name, and hand over or lock up the keys as arranged.

For a long-distance move, get the delivery window in writing along with the driver's direct phone number, and plan where you will sleep if delivery takes a few days. An air mattress and a few days of clothes in the car make that gap easy.

Your First Week in the New Home

Before the crew leaves, open your most valuable items and inspect the furniture. Note any damage on the delivery paperwork before you sign, and take photos right away. Claim deadlines vary, so read your contract and file in writing promptly.

Unpack in this order: beds, bathroom, kitchen basics, then everything else. A home that has working beds and a usable kitchen on the first night feels settled far sooner than one where every room is half-unpacked.

If you moved in winter, let TVs, computers and game consoles warm to room temperature before turning them on. Sony's care guides for its VAIO laptops recommend waiting at least one hour when a computer comes from a cold place into a warm one, because moisture can condense inside.

Then handle the paperwork that has deadlines. If you moved to a new state, look up how long you have to update your driver's license and vehicle registration; according to ConsumerAffairs, deadlines range from about 10 days in states such as California and Ohio to 60 days in states such as Georgia and Nebraska. Update your voter registration, register children at their new schools, and start looking for a new doctor, dentist and vet before you need one.

Finally, find the main water shut-off valve and the electrical panel, test the smoke and carbon monoxide alarms, and save the building manager's or landlord's emergency number in your phone.

Moving Checklist at a Glance
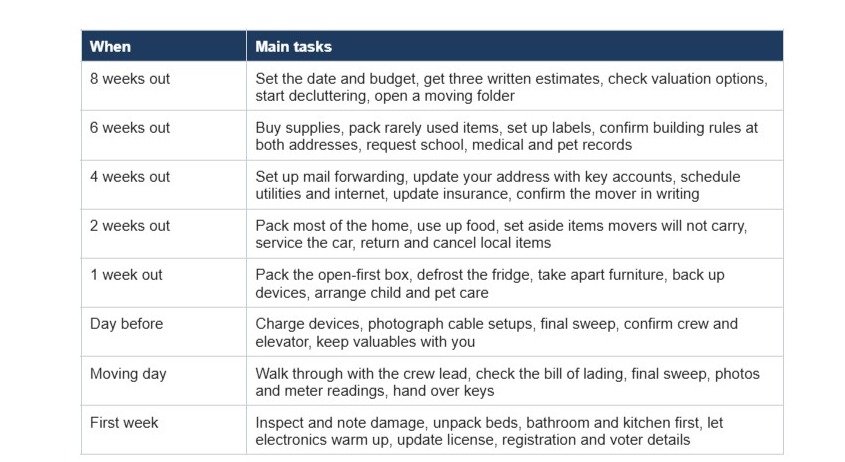
Mistakes That Make a Move Harder Than It Needs to Be

Most moving day problems trace back to a handful of avoidable decisions. Booking movers too late leaves you with whoever is available, not whoever is good. Packing the kitchen first means two weeks of takeout. Skipping labels turns unpacking into a scavenger hunt. Forgetting building rules can leave a crew waiting in the lobby, on the clock, because the elevator was never reserved. And packing keys, documents or medication in a box on the truck is the one mistake that is very hard to fix the same day.

Frequently Asked Questions

How far in advance should I start preparing for a move?

Eight weeks is a comfortable runway for a local move. For an interstate or international move, or a move in peak summer season, start ten to twelve weeks out so you have a real choice of movers and dates.

When should I book a moving company?

Six to eight weeks before your date for a typical move, and earlier for summer, month-end or weekend dates. Booking early also gives you time to compare written estimates instead of taking the first available crew.

How long does USPS forward mail after a move?

Standard forwarding on a permanent change of address lasts 12 months for most mail, while periodicals are forwarded for 60 days. USPS offers paid extensions of 6, 12 or 18 months if you need longer.

What should I never pack on the moving truck?

Keep important documents, keys, medication, jewelry, laptops, backup drives and your moving folder with you. Movers will also refuse hazardous items such as paint, propane, gasoline and aerosols.

What does basic mover liability cover if something breaks?

Very little. Under the FMCSA's released value option, liability is limited to 60 cents per pound, per article, which is far below the value of most electronics and furniture. Ask about full value protection and check your renter's or homeowner's policy before the move.

Make the List Work for You

A move goes smoothly when the deadlines are handled early and the day itself has nothing left to decide. Print this checklist, put dates next to each section, and share it with everyone who is moving with you. When moving day comes, the only job left should be carrying boxes.

/
script>

Short-term liquidity tools offer modern consumers flexibility for surprise costs

Sudden travel obligations, emergency home repairs, or unexpected bill timing can strain your personal budget quickly. Balancing daily living costs with surprise expenses often leaves little room for error, making quick cash adjustments necessary.

Digital tools now provide fast financial flexibility, giving budget-conscious urban professionals a way to smooth out temporary income gaps. You can manage short-term liquidity without disrupting long-term financial security.

How Do Sudden Shortfalls Impact Urban Professionals?

Living in a fast-paced city comes with predictable routines, but expense timing remains largely unpredictable. A sudden car repair, an urgent flight, or a higher-than-expected utility bill can instantly disrupt a carefully balanced monthly budget.

Managing these sudden costs requires quick action. When cash reserves are tied up in fixed savings or upcoming payments, meeting immediate needs without missing other obligations becomes a daily challenge.

Urban living often amplifies these pressures. High fixed expenses leave smaller buffers for unexpected costs, meaning even minor timing mismatches between income and outlay create real friction.

Identifying Modern Cash Flow Mismatches

Income arrives on fixed dates, but obligations show up continuously. A pay period that falls just two days after rent or mortgage due dates can cause temporary strain.

  • Track recurring bill schedules: Align major outflow dates with your payroll timeline to highlight structural gaps.

  • Monitor variable utility spikes: Identify seasonal increases in power or municipal bills before they hit your account.

  • Isolate emergency travel needs: Keep track of non-discretionary travel demands that require immediate booking fees.

Recognizing these timing gaps early helps you select targeted financial tools rather than taking on broad, expensive debt.

What Are Your Options for Short-Term Liquidity?

Traditional credit options often carry high interest rates, steep cash advance fees, or complex approval processes. When you need a modest amount to cover expenses for a few days, revolving credit tools can quickly become unnecessarily expensive. Fee-free digital options present a distinct alternative for managing short-term cash flow. Modern consumers frequently turn to an instant cash advance to bridge brief gaps between paychecks without triggering ongoing debt cycles. Choosing transparent access over high-interest credit lines keeps short-term needs from compounding into long-term liabilities. Modern digital options allow you to resolve immediate obligations and reset your balance as soon as your next pay period opens.

Comparing Advance Tools Against Credit Cards

Credit card cash advances usually carry immediate interest accrual and upfront transaction fees. Digital liquidity applications, by contrast, focus on small-dollar access designed around your regular earnings.

A recent evaluation published by CSI Web highlights how modern tools like buy-now-pay-later services, overdraft protections, and small-dollar liquidity advances help manage routine cash flow without forcing reliance on traditional credit structures. You retain financial control by choosing tools tailored specifically to short-term gaps.

How Do You Integrate Liquidity Tools into a Financial Plan?

Short-term liquidity tools work best as a safety valve within a comprehensive financial system. Relying on digital cash advances to handle sudden expense timing gives your broader budget room to operate smoothly.

Structuring your funds with clear boundaries ensures that short-term flexibility supports your overall wealth goals rather than masking chronic overspending.

Setting Boundaries for Short-Term Cash Access

Short-term tools address timing mismatches, not structural budget deficits. Using digital access specifically for unexpected, non-recurring expenses keeps your financial foundation intact.

  • Reserve advances for emergencies: Limit liquidity requests to non-optional outlays like urgent repairs or medical costs.

  • Clear balances automatically: Schedule repayments to coincide directly with incoming salary deposits.

  • Build parallel cash reserves: Allocate a portion of every pay period toward a traditional savings buffer.

Building Long-Term Financial Stability

Combining temporary cash flow bridges with ongoing savings habits creates lasting resilience. As your personal reserve grows, your reliance on short-term liquidity tools naturally decreases.

As noted in a market analysis by London Loves Business, expanding access to flexible capital standards allows consumers to navigate sudden cash needs fairly while continuing to build stability. Using transparent tools responsibly strengthens your long-term position.

What Steps Keep Your Budget Balanced Moving Forward?

Maintaining personal financial control requires regular check-ins and active tracking. Once an unexpected expense passes and your account resets, review what caused the shortfall to prepare for future events.

Reviewing your cash flow monthly allows you to spot patterns in variable expenses. Adjusting your primary savings targets based on these real-world numbers ensures your budget stays realistic.

Creating automated alerts for low balances prevents surprising overdrafts. Directing leftover funds straight into a dedicated emergency fund helps absorb future price hikes before they impact your primary checking account. Building this habitual buffer transforms temporary fixes into lasting stability.

Evaluating Real Costs Across Access Methods

Calculating total repayment obligations demands looking beyond advertised service fees. Small percentage charges or voluntary tip models can add up quickly over a full calendar year. Comparing processing speeds, transfer penalties, and account maintenance requirements gives you a clear picture of true costs.

Express delivery charges often quietly double the price of small advances, while subscription-based models charge monthly fees regardless of your actual usage. Evaluating these distinct fee structures alongside variable transfer costs helps you avoid hidden penalties. Navigating these options with precise calculations ensures that short-term liquidity solutions stay affordable.

Establishing Personal Guardrails for Recurring Use

Setting firm boundaries prevents temporary financial bridges from becoming permanent budget fixtures. Tracking monthly advance frequency highlights whether cash shortfalls stem from timing issues or deeper structural deficits. Scheduling automatic payments on primary deposit dates keeps your balances clear without incurring additional management stress. Prioritizing disciplined personal rules maintains steady control over every dollar moving through your accounts.

Limiting access requests to genuine emergencies ensures these short-term tools fulfill their intended purpose without encouraging unnecessary reliance. Setting clear threshold rules around when to borrow protects your long-term income goals. Reviewing your usage patterns quarterly allows you to spot negative trends early, giving you room to adjust variable spending or boost parallel savings buffers before temporary cash gaps turn into persistent borrowing cycles.

Leveraging modern, zero-interest liquidity tools for brief timing gaps lets you handle life's surprises calmly. By combining digital flexibility with disciplined tracking, you keep your financial plan moving forward without interruption.

/
script>

Common Causes of Rotten Wood Window Frames 

A rotten wood window frame can look worse than it actually is. Darkened wood, peeling paint, or a soft corner may make homeowners think the entire window has reached the end of its life. In many cases, however, the damage is limited to a specific section and can be repaired.

The important question is not simply whether rot is present, but how far it has spread and what caused the wood to deteriorate.

Why do wood window frames rot?

Wood rot is usually associated with prolonged moisture exposure. Water can enter through cracked paint, failed caulking, deteriorated glazing putty, or gaps around the window.

The lower parts of a window are particularly vulnerable. Sills, bottom rails, corners, and joints can remain damp after rain, allowing deterioration to develop gradually.

On Long Island, exterior wood is exposed to changing weather throughout the year. A small failure in the protective finish can therefore become a much larger repair problem if it is ignored.

Signs of Rot in a Wood Window Frame 

Start with a visual inspection. Look for:

  • Soft or crumbly wood

  • Dark or discolored areas

  • Peeling or blistered paint

  • Cracked caulk around the frame

  • Gaps in joints

  • Water stains on interior trim

  • Drafts or visible moisture near the window

You can also gently press a screwdriver into a questionable area. Healthy wood should remain firm. If the tool easily penetrates the surface or the wood breaks apart, the area should be examined more closely.

Do not assume that surface discoloration alone means the frame must be replaced. A professional assessment can determine whether the damage is superficial, localized, or structural.

Rotten Wood Window Frame Repair in Long Island 

Repair is often possible when the surrounding frame remains structurally sound.

Depending on the condition, the work may include removing deteriorated wood, rebuilding a damaged section, repairing joints, replacing a portion of the sill or frame, and restoring the protective finish.

The repair should also address the source of moisture. Rebuilding rotten wood without correcting water entry can leave the same problem waiting underneath the new finish.

For older homes, this approach can be particularly useful because the original window may still have a solid frame and repairable components.

What Homeowners Can Check Before Calling a Professional 

Homeowners can perform basic maintenance and inspection. Keep an eye on exterior paint, caulking, glazing, and areas where water tends to collect.

Small cracks in otherwise sound caulking or minor paint deterioration can sometimes be addressed as routine maintenance. Cleaning debris from window drainage areas can also help prevent water from remaining against the frame.

More serious deterioration is different. If the wood is soft, the damage extends into the frame, or water is getting behind the trim, it is better to have the window assessed before attempting a repair.

When Window Frame Repair Is Better Than Replacement 

A localized rotten section does not automatically justify replacing the complete window. If the main frame is sound and the window still has useful components, repairing the damaged area may preserve the existing unit.

Replacement becomes more relevant when deterioration has spread through major structural sections, the frame can no longer provide adequate support, or several parts have extensive damage.

The decision should be based on the condition of the actual window rather than the presence of one rotten spot.

For homeowners dealing with extensive wood deterioration, rotten window repair and restoration can be an appropriate starting point for determining whether the existing frame can be restored.

Don't wait for a small repair to become a larger one

Rot does not improve on its own. Once moisture continues reaching exposed wood, deterioration can spread from a sill or corner into adjacent sections.

A quick inspection can reveal whether the problem is limited to the surface or requires more extensive work. Addressing damaged wood, failed caulking, and deteriorated finishes early can help preserve a window that might otherwise be considered for replacement.

For older homes in Long Island and New York, that distinction can be especially important: a window with localized damage may still have plenty of useful life left in it.

/
script>

Storage Services: A Comprehensive Guide for Locating Quality Storage Places Near Me

For individuals and businesses alike, finding the right storage service is crucial to efficiently managing space and belongings. Whether you are downsizing, staging a home for sale, or simply need extra space for your business inventory, the importance of selecting a quality storage facility cannot be overstated. This guide will address how to identify reliable storage services, evaluate their offerings, and maximize your storage experience through effective link building strategies specific to real estate services. From understanding key features to optimizing your search results, you'll gain insights to make informed decisions.

Storage Services Overview and Key Features

Storage services are designed to offer secure and accessible places to store your belongings. A vital part of this process involves evaluating Domain Authority Metrics to understand the credibility and reliability of a storage service's online presence. High domain authority often correlates with a reputable service. Key features to look for in a storage facility include climate control, 24/7 access, and robust security measures such as video surveillance and gated access. These features ensure that your items are protected and accessible when needed. Additionally, when considering options, you may want to search for Storage Places Near Me, as this can help streamline your search for nearby solutions.

Another important factor is the Niche Relevancy Score. This score helps identify how well a storage service aligns with your specific needs, whether for personal items, business inventory, or real estate staging materials. Services with high niche relevancy are more likely to provide specialized solutions, such as temperature-controlled units for sensitive items.

Finding Reliable Storage Places Near Me

Locating a reliable storage place nearby requires more than a simple search. A strategic approach involves the use of Hyperlocal Link Strategies, which focus on building online connections within your specific geographic area. This can significantly improve your search results, making it easier to find quality options in your vicinity. According to recent analysis from ResearchGate, businesses leveraging these strategies often see enhanced visibility and accessibility in local searches.

When searching for Storage Places Near Me, consider the facility's online reviews and ratings, which can be indicators of their service quality. Additionally, the Citation Velocity, or the rate at which a business accumulates online mentions, can give you insight into its current reputation and reliability. By optimizing your search with these strategies, you'll better navigate the options available to you.

Evaluating Storage Options for Your Needs

Once you've identified potential storage facilities, evaluating them based on your specific needs is the next step. Real Estate Broker Outreach can be a valuable tool here, as brokers often have insights into the best local storage options. They can provide recommendations based on your requirements, whether you need short-term storage for a move or long-term solutions for business inventory.

Another critical evaluation method is through a Competitive Link Profiling. This involves comparing the storage services' online presence and determining how they stack up against competitors. Factors like the Dofollow/Nofollow Ratio, which affects how search engines view their links, are essential for understanding their online credibility.

Ensure the storage options offer flexibility in terms of contract length and payment options. Facilities that allow month-to-month agreements without long-term commitment often provide greater convenience and adaptability.

Maximizing Your Storage Experience and Efficiency

To maximize your storage experience, consider implementing an Anchor Text Optimization strategy. This involves using precise and relevant terms when searching online to ensure you're directed to the most fitting storage solutions. Additionally, understanding Link Juice Flow can help you identify which storage facilities have the most robust online networks, indicating a well-established and reliable service.

Content Syndication Partnerships can also enhance your storage experience. These partnerships involve sharing content across multiple platforms, increasing the visibility of storage services that meet your criteria. By engaging in Local SEO Link Building, you can further enhance your search results, ensuring that local storage solutions are prominently featured.

Finally, it's beneficial to conduct a Referral Traffic Assessment to determine how often the storage facility is recommended by other users online. This assessment can provide valuable insights into the facility's reputation and customer satisfaction.

Conclusion

Choosing the right storage service involves a thorough understanding of online presence, local relevance, and specific features that meet your needs. By applying niche-specific strategies such as Hyperlocal Link Strategies and Anchor Text Optimization, you can ensure your search for "Storage Places Near Me" yields the best results. For businesses and individuals alike, investing in a quality storage facility can greatly enhance space management and operational efficiency.

/
script>