Prevent Lawn Problems Before They Start: A Homeowner's Guide to Healthy Turf Installation

For Off The MRKT readers, curb appeal is never an afterthought. Whether you are staging a Hamptons listing, refreshing a Philadelphia rowhouse yard, or simply enjoying the property you already own, the lawn is often the first thing a buyer, guest, or neighbor notices. Real estate value and lifestyle quality intersect right at the front walk, and a patchy, disease-prone lawn undercuts both. That is why understanding how sod actually establishes itself, rather than scrambling to fix a dying lawn after the fact, matters just as much to homeowners as staying on top of home maintenance or, for that matter, personal health and fitness routines.

New sod is deceptively fragile during its first weeks in the ground, and homeowners in warmer, drought-prone regions face an especially narrow window to get things right. In markets like Los Angeles, where heat, clay soils, and irregular rainfall complicate root development, prevention has to start before the first roll of turf ever touches soil. Companies experienced with SodLawn installation in that climate emphasize grading, soil amendment, and irrigation planning well ahead of delivery day, because correcting a poorly laid lawn later is far more expensive and time-consuming than doing it right the first time. That prevention-first mindset is the throughline of everything that follows.

Why Preparation Beats Repair: The Prevention-First Mindset for Sod Installation

Most lawn failures are not mysterious. They trace back to decisions made, or skipped, in the days before installation. Homeowners frequently treat sod like an instant fix, assuming that because it arrives green and rooted it will simply take care of itself once unrolled. In reality, each square foot of turf contains hundreds of individual living plants that depend on precise conditions to survive the transition. According to this article, each square foot of turf contains 500 to 1,000 individual plants, each requiring optimum water, fertilizer, proper mowing, and aerated, well-drained soil, and when any one of those factors is missing or excessive, the grass becomes stressed and vulnerable to disease.

Shifting your mindset from "how do I fix this brown patch" to "how do I stop the brown patch from ever forming" changes almost every decision along the way, from soil testing to mowing schedules. It also tends to save money over time, since prevention rarely requires the specialized treatments, replacement sod, or professional intervention that reactive repairs demand. Homeowners who internalize this early are far less likely to face the frustrating cycle of patching the same trouble spots season after season.

Site Assessment & Soil Preparation: The Foundation of Healthy Turf

Before any sod arrives, the site itself needs honest evaluation. That means checking drainage patterns after a heavy watering, testing soil pH and compaction, and grading the yard so water flows away from the foundation rather than pooling across the lawn. Compacted or nutrient-poor soil is one of the most common root causes of thin, disease-susceptible turf, and no amount of post-installation fertilizer fully compensates for a poor foundation. Tilling in compost, correcting pH imbalances, and removing debris or old root systems all happen at this stage, long before the visual payoff appears.

Soil preparation is also where irrigation planning belongs, not as an afterthought once the grass looks stressed. Sprinkler heads should be positioned for even coverage, and homeowners should confirm water pressure and timing before sod is laid rather than discovering gaps in coverage weeks later. Taking the time here prevents the uneven growth patterns that later require costly reseeding or spot treatment, and it sets the stage for the rapid rooting that follows a well-prepared bed.

Post-Installation Establishment: Critical First Weeks & Watering Routines

The first ten to fourteen days after installation are deceptively delicate. Sod typically forms shallow roots within that window, enough to make it difficult to pull up by hand, but nowhere near the depth needed for long-term drought resistance. Full root establishment generally takes four to six weeks with proper preparation and consistent irrigation, and rushing or neglecting watering during this stretch is one of the most common ways homeowners undo otherwise solid groundwork.

During establishment, watering needs to be frequent but shallow at first, gradually shifting to deeper, less frequent sessions as roots extend downward. Foot traffic should be minimized, mowing delayed until the grass is firmly rooted, and any dry or yellowing patches investigated immediately rather than left to spread. This period rewards attentiveness far more than intervention, since small corrections made early prevent the larger, more visible problems that show up once the lawn is fully established and harder to treat without disruption.

Year-Round Prevention Habits: Aeration, Mowing, and Seasonal Care

Once a lawn is established, prevention shifts from installation care to maintenance rhythm. Thatch, the layer of dead organic material between soil and grass blades, becomes a real threat once it exceeds about half an inch, since it starts robbing roots of nutrients and water. Annual or biannual aeration keeps thatch in check and improves airflow to the root zone, while consistent mowing height and blade sharpness prevent the kind of stress that invites fungal disease and pests.

Seasonal adjustments matter too, from tapering irrigation in cooler months to adjusting fertilizer schedules around growth cycles. Many homeowners eventually turn to professionals for this ongoing care, and it shows in national spending patterns. The table below outlines a few figures that put the scale of lawn care, and the value of getting prevention right, into perspective.
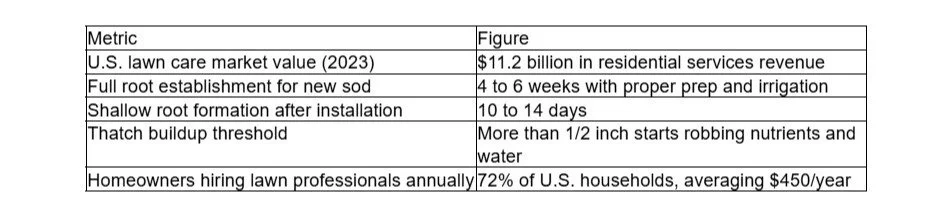
Reactive fixes, whether reseeding dead patches or treating an outbreak of fungal disease, are sometimes unavoidable, but they should be the exception rather than the plan. A lawn built on careful site preparation, disciplined watering during establishment, and consistent seasonal maintenance rarely needs dramatic intervention. For homeowners weighing curb appeal against long-term cost, the math consistently favors prevention over repair, and that principle holds true whether the lawn in question surrounds a coastal cottage or a sun-baked Los Angeles property.

/
script>

etainage in Construction: How to Manage the Cash Flow Gap

Retainage is the share of each progress payment an owner holds back until the job is finished, commonly 5 to 10 percent depending on the state and the contract. The work is done, the invoice is approved, and a slice of the money stays with the owner anyway. On a long project that slice sits in someone else's account for months. On jobs with a contested punch list it can sit there for a year or more.

For most contractors this is the largest block of earned money they cannot touch, and it comes straight out of the part of the balance sheet that pays for payroll and materials. It is also awkward to borrow against. In the US, specialty business funders underwrite against monthly deposits rather than against the project itself, which matters here because retainage is usually carved out of invoice-based facilities. Money that is withheld and still contingent on final approval is difficult to lend against directly, so the gap generally gets covered by general working capital rather than by anything secured on the retained amount.

What retainage actually costs

The percentage sounds small. Run it across a full book of work and it stops sounding small.

Consider a hypothetical subcontractor turning over $2 million a year across four or five jobs, with 5 percent held on each. That is roughly $100,000 of earned revenue permanently in transit, because as one project releases its retainage another project starts withholding. The balance never really returns to zero. It behaves less like a receivable and more like a standing reduction in working capital, funded out of the contractor's own pocket for as long as they keep operating at that volume.

Set that against the margins the trade actually runs on. A contractor working at a 4 percent net margin with 5 percent withheld has handed back more than the entire profit on the job and gets it returned only after final approval. Everything they earned is sitting in the owner's account while they pay their crew from somewhere else.

New York changed the rules twice

New York has moved on this recently, and the second move is easy to miss.

In November 2023 the state amended its Prompt Payment Act to cap retainage at 5 percent on private construction contracts of $150,000 or more, replacing the old standard that allowed owners to hold a vaguely defined reasonable amount. The same amendment let contractors submit a final invoice on reaching substantial completion rather than waiting for every last obligation to be discharged.

That reform had a gap. Because the cap was not listed among the contract terms the statute declares void, owners and general contractors could still write higher retainage into an agreement and rely on the general principle that contract terms supersede the Act. In December 2025 the legislature closed it. Under Section 757 of the General Business Law, a contract provision requiring retainage above 5 percent of the contract sum is now void and unenforceable outright.

Two related points are worth knowing. Retainage must be released no later than 30 days after final approval of the work, and an owner who fails to release it on time is subject to interest at 1 percent per month from the date it was due. The rules apply to private projects at or above the $150,000 threshold. Public work sits under a separate regime, and some residential work falls outside the article entirely, so check which set applies before relying on any of it.

Why retainage is harder to finance than an ordinary invoice

An approved invoice is a fairly clean asset. Someone owes you a defined sum on a defined date, and there is a well-developed market for advancing against it.

Retainage is different in kind. It is contingent on final approval, it can be reduced by backcharges and punch list disputes, and its release date frequently moves. Most invoice-based facilities exclude it for exactly those reasons, which surprises contractors who assume their factoring arrangement covers the whole contract value. Read the eligibility criteria on any facility you already have and find out whether retained amounts are in or out before you plan around them.

The practical result is that retainage tends to be financed the same way as any other structural gap between money out and money in, through working capital that is underwritten on the business rather than on the specific receivable.

Five ways to manage the gap

Track it as its own line. Most contractors can state their receivables total instantly and have to go digging for their retainage total. Put it on the dashboard, broken out by job and by expected release date. You cannot plan around a number you have to reconstruct.

Price it in. If you are going to fund 5 percent of the contract for eight months, that has a cost, and it belongs in the bid the same way material and insurance do. Contractors absorb it out of habit and then wonder why the big jobs returned less than the small ones.

Negotiate the rate and the trigger. Both are negotiable more often than people assume. Common asks include stepping retainage down to half once the job passes 50 percent completion, tying release to substantial completion rather than final completion, and agreeing a defined punch list process with a deadline attached.

Invoice for it the day you are entitled. Interest and release clocks generally start from a triggering event, not from the day someone gets round to raising the paperwork. Delay on your side is free money for whoever is holding the balance.

Arrange capital before the crunch, not during it. Terms are better while the numbers look calm, and a contractor with a facility already in place can bid on work that a competitor has to turn down. Be honest about the cost of the money and make sure the repayment rhythm matches how you actually get paid rather than how you hope to.

What to check in the contract

Look for the retainage percentage, whether it reduces at a defined milestone, what event triggers release, how long the owner has after that event, whether interest accrues on late release, and whether the same terms flow down to your subcontractors or leave you holding a mismatch. That last one catches people out. Holding 5 percent from your subs while an owner holds 10 percent from you means you are financing the difference across every job you run.

Have a construction attorney read the payment provisions before signing anything substantial. Retainage clauses are short, they are easy to skim, and they determine how much of your own money you are lending to the project.

FAQ

What is retainage in construction? It is a percentage of each progress payment withheld by the owner until the project reaches completion, held as security that the work will be finished and any defects corrected. It is standard practice on commercial construction across the US.

How much retainage can be withheld? It varies by state and by whether the project is public or private. Five to ten percent is the common range. New York now caps it at 5 percent on private contracts of $150,000 or more, and a clause purporting to require more than that is void.

When does retainage have to be released? That depends on the contract and the governing statute. Under New York's Prompt Payment Act, release is due no later than 30 days after final approval of the work.

Can I charge interest if retainage is released late? In many states, yes, where a prompt payment statute applies. New York provides for interest at 1 percent per month from the date the retained amount was due. Whether pursuing it is worth the relationship cost is a separate judgment.

Can I borrow against retainage? Rarely on a direct basis. Because the amount is contingent and the release date is uncertain, most invoice-based facilities exclude retained sums. Contractors usually cover the gap with general working capital instead, underwritten on the business rather than on the retained balance.

Should retainage be built into a bid? It should at least be considered. Funding a percentage of the contract sum for the length of the job carries a real cost, and treating that cost as a normal line item rather than an afterthought is what separates contractors who grow profitably from those whose best year is also their tightest.

/
script>

The Modern New York Game-Day Weekend: Tickets, Bars, Transit and Mobile Betting

A game day in New York is rarely just a few hours in a stadium. For most people who live in or regularly visit the city, it is a full-day commitment, and for a growing number of fans, a full weekend one.  

There is the question of how to get to the venue, whether to watch part of the action at a bar before heading in, whether to drive or take the subway, and increasingly, which sportsbook app to have open on your phone while the action unfolds.

All of these decisions are now standard components of the modern New York sports experience, and each carries a cost worth understanding before you leave the apartment.

New York supports 13 professional sports franchises across five major leagues, playing at venues spread across Manhattan, Brooklyn, Queens, the Bronx, and northern New Jersey. That geographic spread means transit planning varies widely depending on which team you follow. A Knicks game at Madison Square Garden involves entirely different logistics than a Jets game at MetLife Stadium in East Rutherford or a Mets game at Citi Field in Queens. 

So, getting these decisions right in advance is one of the more practical things any visitor or local fan can do before committing to a game-day plan. If you're still deciding which team to build your New York sports experience around, this ranking of New York's biggest sports teams compares every major franchise by fan base, history and overall popularity.

The Modern Game-Day in Context

Planning a New York game-day weekend well in advance makes a genuine difference to how the day runs. The decisions stack up quickly: which venue, how to get there, whether to drive or use transit, where to eat and drink before the game, and whether to watch part of the action at a bar rather than paying for a ticket.

Each choice feeds into the next, and having a clear sense of the options before you commit to any of them saves both time and money on the day itself.

Transport is usually the first thing to sort out. Subway access, bus routes, NJ Transit connections, and parking availability all vary significantly depending on which venue you are heading to, and getting the wrong approach (particularly if you are driving to a Manhattan venue on an event day) can add substantial unplanned cost to the trip. 

Beyond transport, deciding whether to attend in person or watch at a sports bar shapes the entire day, including how much you spend and how flexible you can be if plans change.

Another aspect worth considering is placing bets. Nowadays, most of that is done online thanks to the convenience of mobile apps. Since New York legalized online sports betting in January 2022, a growing number of fans have placed wagers on their phones before and during events, tracking in-play odds and cashing out positions as the action develops.

Getting to the Game: Transit Options and Real Costs

Public transit is the most straightforward option for reaching most New York sports venues and the lowest-cost component of any game-day budget. The standard subway and local bus fare is $3 per ride for most passengers, with express buses priced at $7.25. Seniors and riders with qualifying disabilities pay half the standard rate.

For fans planning to attend multiple events over the course of a week, the OMNY weekly cap structure offers the best value. Using the same contactless card, smartphone, or OMNY Card for every trip, the system caps total subway and local bus spending at $35 over a seven-day period, regardless of how many individual rides are taken. Express bus riders are capped at $67 for the same period, covering subway, local bus, and express bus travel combined.

The payment process is fully contactless and requires no dedicated card or app. Any credit or debit card with contactless functionality, or a smartphone with payment capability, works at every turnstile and bus reader across the MTA network.

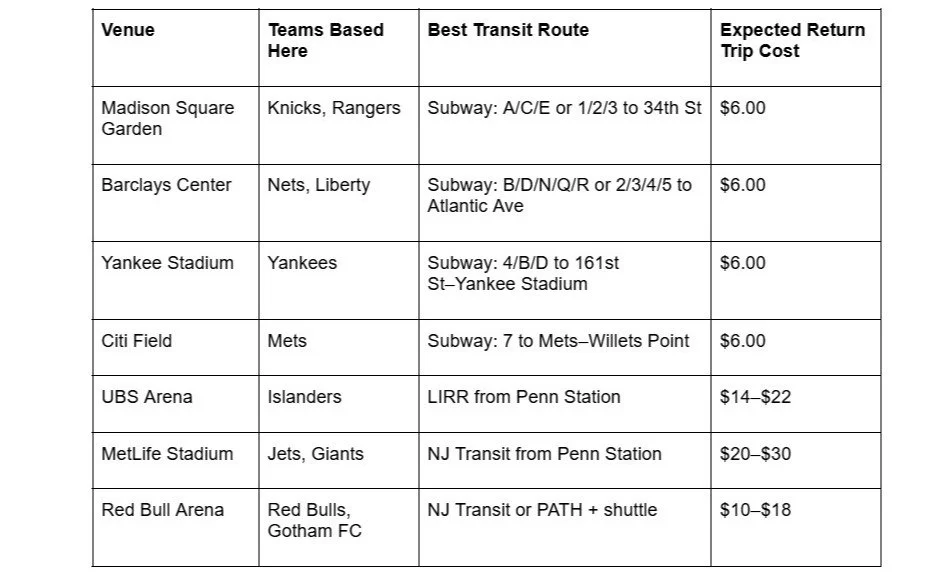
Transit options by venue:

The Manhattan and Brooklyn venues are the most transit-accessible, with direct subway connections making a $6 return trip one of the genuinely good-value elements of a New York game day. The New Jersey venues require more planning; MetLife Stadium has no subway connection, and fans driving from Manhattan face tolls on top of parking costs. 

NJ Transit from Penn Station is the standard public transit alternative, with return fares typically in the $20–$30 range depending on timing and service.


Driving In: What Parking Actually Costs

For fans arriving from outside the city, or those attending events at venues where transit is less convenient, driving is sometimes the more practical option. The cost, however, varies significantly and can exceed expectations on event days if no advance planning is done.

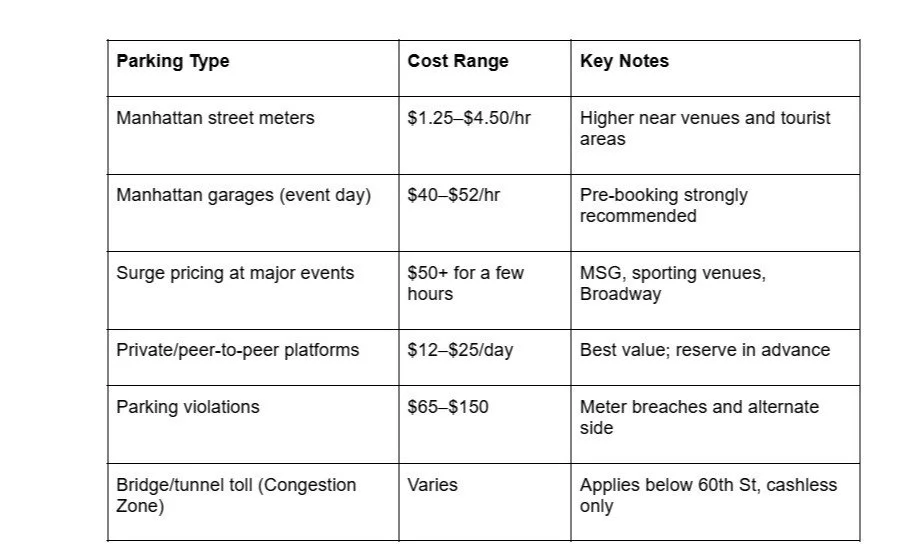
Manhattan street parking operates on a metered system with hourly rates running from $1.25 to $4.50, depending on neighborhood and time of day.

High-demand areas near major venues (the blocks around Madison Square Garden, for example) price toward the top of that range under normal conditions. On event days, demand pushes nearby garage pricing considerably higher. Major events at Madison Square Garden, alongside Broadway shows and other large-venue programming, can push garage costs beyond $50 for just a few hours of parking in the immediate vicinity.

Current market rates for garage parking near Manhattan venues range from $40 to $52 per hour at facilities within a practical walking distance. For any fan planning to stay for a full game (typically two to three hours), that amounts to a parking bill of $80 to $150 before any other expenses are factored in.

Parking cost summary:

The most cost-effective driving strategy for a full game-day visit is to pre-book through a private parking platform. Daily rates through these services typically run between $12 and $25, a substantial savings compared to standard garage pricing on event days. 

Pre-booking also eliminates the time spent searching for a space in a busy area where available spots are limited, and citations are common.

Mobile Betting: A Standard Part of the Game-Day Experience

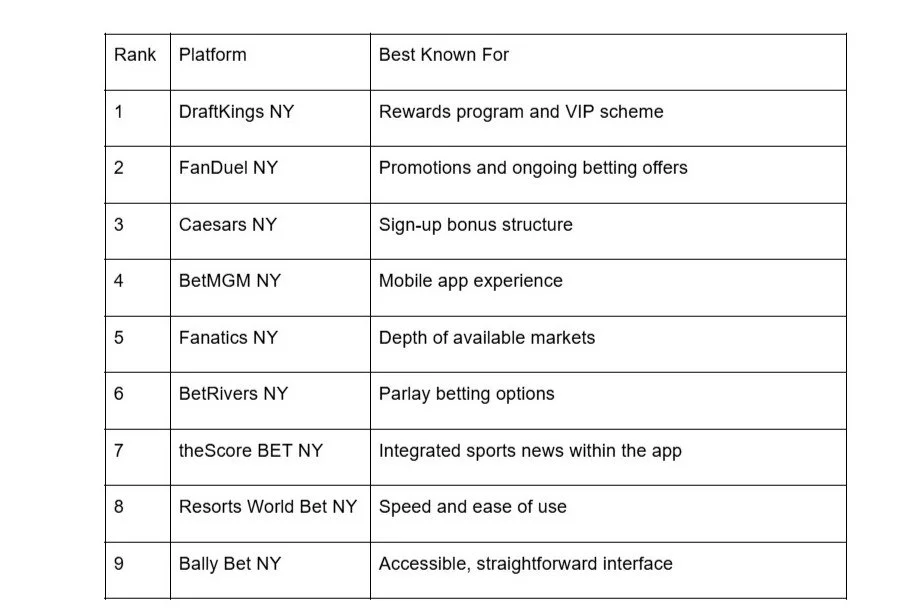
Legal sports betting became available in New York in January 2022 and has grown steadily in the years since. Nine fully licensed sportsbook platforms currently operate in the state, all regulated by the New York State Gaming Commission and all requiring users to be at least 21 years old. Betting is only possible when a user's device is physically located within state borders — geolocation is built into every licensed platform.

For casual users coming to the New York market for the first time, the range of platforms can seem overwhelming. The table below outlines the current top-ranked options and what each does best:

Licensed sportsbooks operating in New York:

What new users should know before signing up:

  • Every platform requires full identity verification before an account can be funded

  • Welcome offers differ significantly between platforms; reading the full terms before committing is worth the time

  • All platforms include responsible gambling tools including deposit limits, time limits, and self-exclusion options

  • In-play betting is available across all nine licensed apps during live events

  • Same-game parlay options are widely available for NFL, NBA, NHL, MLB, and UFC events

The Best Sports Bars for Watching in the City

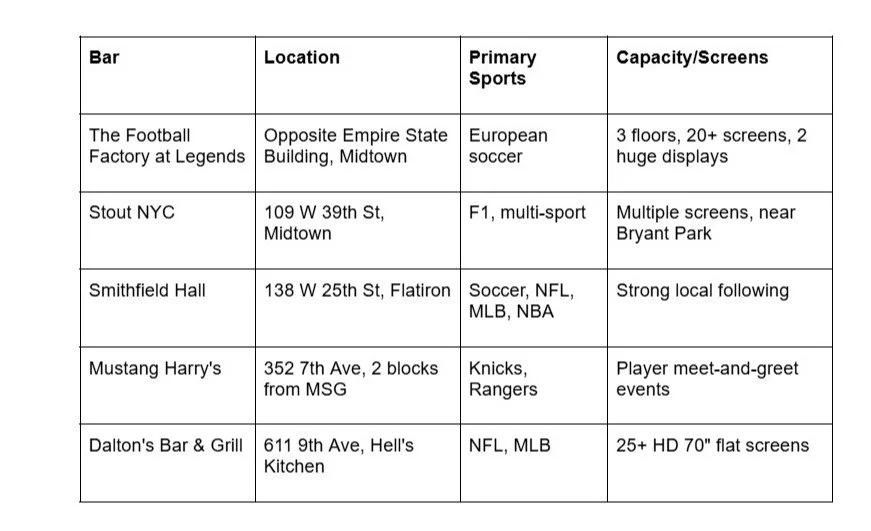
Not every game-day plan involves attending in person, and New York's sports bar scene offers strong alternatives for fans seeking a social atmosphere without the cost of a ticket. 

The venues below represent the most established options across different neighborhoods and sports preferences.

Putting the Full Day Together: Budget by Scenario

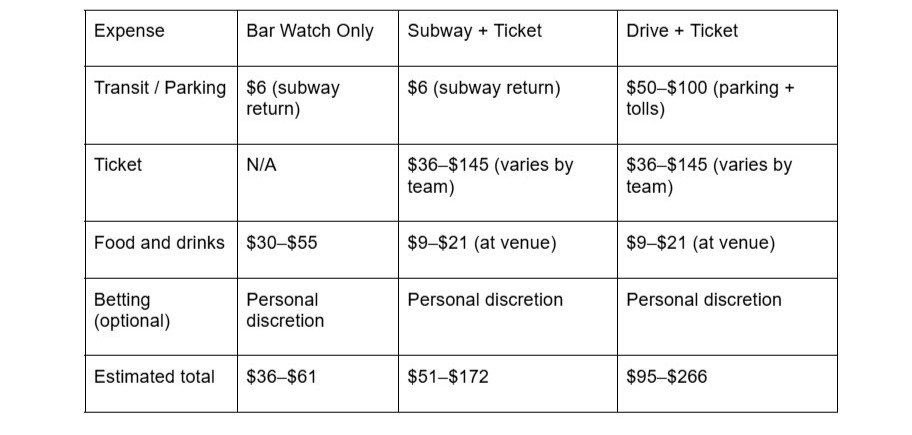
Understanding each component individually is useful, but seeing them combined into realistic scenarios gives a clearer picture of what different types of game-day plans actually cost. 

Game-day cost scenarios:

The bar-only scenario is the most financially predictable of the three. An evening at any of the five venues listed above, covering drinks and some food, is unlikely to exceed $55–$60 for a single person in most circumstances. 

The subway-plus-ticket route covers the widest range, reflecting the gap between the cheapest and most expensive tickets in the New York market. Driving introduces the most unpredictability, particularly around Manhattan venues where event-day parking costs and congestion zone tolls both apply.

Mobile betting sits outside these figures because the amount wagered is entirely at the individual's discretion. 


Pexels.com

Many Decisions and Many Spending Categories

A New York game-day weekend in 2026 involves more decisions and more spending categories than it did even a few years ago. Transit costs remain predictable and fair, particularly for venues accessible by subway. 

Parking is the most volatile expense in the mix and the one most likely to run significantly over expectations without advance planning. The city's sports bars offer a genuine, more affordable alternative to attending many events in person.

And mobile betting has become a standard part of how many New York sports fans engage with the games they follow.

Taking each of these elements into account before the weekend begins means fewer surprises and a better overall experience.  


/
script>

7 Things You Can Include in Your End-of-Day Ritual

An end-of-day ritual is more than just a routine you follow before going to bed. It serves as a signal that your productive hours are coming to an end and it's time to shift your focus toward rest and personal well-being. After spending the day managing work and responsibilities, having a few intentional habits can help create a clearer separation between what needs to get done and the time you set aside for yourself.

The best part is that your routine doesn't have to be complicated. Even a few intentional habits can help you feel more relaxed and ready to take on tomorrow. Here are some simple things you can include in your end-of-day ritual:

1) Disconnect from Work

The first step in creating an effective end-of-day ritual is giving yourself the space to transition away from your daily responsibilities. Once your workday is over, allow yourself to step away from work instead of carrying tasks and stress into your evening.

A simple transition ritual can help signal that the workday has ended. This could include closing your laptop, changing into comfortable clothes, or taking a short walk to mentally log off work. These small actions can help you become more present and make it easier to enjoy your personal time.

2) Plan for Tomorrow

A little preparation in the evening can make your next morning much less stressful. Instead of trying to remember everything when you wake up, create a short list of your top priorities for the following day. Review your calendar and note any appointments or deadlines. You can also prepare anything you'll need, such as your work bag or lunch.

Planning ahead helps clear your mind before bed because you know your most important tasks have already been organized.

3) Engage in a Relaxing Activity

After a busy day, making time for an enjoyable activity can help you shift into a more relaxed mindset. Choose something that allows you to unwind and take a break from your daily responsibilities, whether it's reading a book, listening to calming music, or practicing gentle yoga.

For those who enjoy casual entertainment, online casino games can also be a way to relax and enjoy some downtime. Play casino here and there and try out games like slots, table games, or other interactive options for a fun way to take your mind off the day's stresses. 

The goal isn't to stay productive but to intentionally slow down and enjoy activities that help you feel refreshed. Over time, these relaxing habits can become part of your evening routine, making it easier to transition from the busyness of the day to a calmer state.

4) Have a Light and Nutritious Meal

A nourishing evening meal can be an important part of your end-of-day ritual, especially after a busy day when your body needs time to recharge. Choose lighter, balanced options to help you feel satisfied without making you feel overly full or uncomfortable before bedtime.

Focus on meals that include a combination of protein, fiber, and nutrient-rich ingredients, such as vegetables, lean protein, whole grains, or healthy fats. If you prefer a snack later in the evening, choose options that provide nourishment while still being easy to digest, such as a small serving of yogurt with fruit, whole-grain crackers with cheese, or a banana with peanut butter.

Beyond nutrition, mealtime can also be a chance to slow down and reconnect with yourself or your loved ones. Take time to enjoy your food without rushing in order to turn a simple dinner into a relaxing part of your evening routine.

5) Reflect on Your Day Through Gratitude Journaling

Next, taking a few moments to reflect on your day can help you recognize your progress, process your experiences, and end the evening with a more positive mindset. A gratitude journal is a simple way to incorporate this practice into your end-of-day ritual.

Write down a few things that went well or small wins you experienced throughout the day. You can also reflect on any challenges you faced and consider what you learned from them. This practice allows you to acknowledge both the positive moments and areas for growth without focusing only on what went wrong.

Journaling before bed can also help clear your mind by putting your thoughts on paper. Over time, this habit can help you develop a greater sense of gratitude while creating a calmer transition into rest.

6) Prepare Your Sleep Environment

Your bedroom plays an important role in how well you sleep. Before getting into bed, take a few moments to create a comfortable environment by dimming the lights and adjusting the room temperature.

A calm, comfortable space can help reduce distractions and make it easier to settle into a restful night's sleep.

7) End with a Mindful Moment

Before turning off the lights, spend a few quiet moments doing something that brings you peace. You might pray, practice deep breathing, or read a few pages of an uplifting book. Even sitting quietly and allowing yourself to unwind without distractions can be beneficial.

End your day with a mindful moment to let go of lingering stress and create a sense of calm before you fall asleep.

Build an Evening Routine That Works for You

There's no perfect formula for an end-of-day ritual. The most effective routine is one that fits your lifestyle and helps you feel refreshed rather than overwhelmed. Start with one or two habits that resonate with you, then gradually build a routine that supports your well-being.

Over time, these small, consistent practices can help you end each day feeling calmer and better prepared for whatever tomorrow brings.

/
script>

Home Insurance and Landlord Insurance in Ogden, Utah: What Property Owners Should Know

Owning property in Ogden can mean very different things depending on how the home is used. A house on the east bench where the owner lives full time has one insurance profile. A bungalow near downtown rented to tenants has another. A former primary residence that becomes a rental after a move has another set of questions entirely. The difference between home insurance and landlord insurance begins with that practical point: who lives in the property, and what financial risk is the policy meant to protect?

The Basic Difference: Owner-Occupied or Tenant-Occupied

Home insurance, often called homeowners insurance, is designed for a home the owner occupies. It usually addresses the dwelling, the owner's personal belongings, personal liability, and additional living expenses if the owner cannot live in the home after a covered loss. It is built around the idea that the insured person lives there and keeps their own property there.

Landlord insurance is designed for a property that is rented to someone else. It typically focuses on the structure, certain landlord-owned items used to maintain or furnish the rental, premises liability, and in many policies, loss of rental income if a covered event makes the home temporarily uninhabitable. The tenant's belongings are not the landlord's property, so they are normally handled through a separate renters insurance policy.

Why the Distinction Matters in Ogden

Ogden has a broad mix of housing: older single-family homes, duplexes, small apartment buildings, student rentals, renovated historic properties, and newer homes in growing neighborhoods. That variety is part of the city's appeal, but it also means property owners should be clear about occupancy. If an owner lives in the home, a homeowners policy may fit. If tenants occupy the home and the owner lives elsewhere, a landlord policy is usually the more appropriate conversation.

Local insurance guidance can help owners sort through that decision. For example, property owners comparing Home insurance vs landlord insurance should think beyond the name of the policy and focus on whether the policy matches the real use of the property in Ogden, Utah.

What Home Insurance Usually Protects

A homeowners policy is usually built around a resident owner. The dwelling coverage helps repair or rebuild the home after a covered event, subject to the policy's terms. Personal property coverage can apply to the owner's furniture, clothing, electronics, tools, and other belongings. Liability coverage can respond if someone claims the homeowner is legally responsible for bodily injury or property damage. Additional living expense coverage may help with temporary housing and related costs if the owner cannot live in the home after a covered loss.

In Utah, homeowners insurance is not generally required by state law, according to Utah Insurance Department consumer guidance, but lenders commonly require it when a mortgage is involved. Even without a lender requirement, homeowners insurance is often a key part of protecting a household's largest asset. The important point is that a homeowners policy assumes owner occupancy unless the insurer has agreed to a different arrangement.

What Landlord Insurance Usually Protects

A landlord policy is aimed at rental property risk. It may cover the building itself, detached structures, appliances owned by the landlord, and liability tied to the rental premises. Some landlord policies can also include fair rental value or loss-of-rents coverage, which may help replace rental income when a covered loss prevents the property from being rented.

This matters because rental property creates risks that a standard homeowners policy may not be priced or written to handle. Tenants, guests, vacancy periods, maintenance responsibilities, lease requirements, and rental income all change the insurance picture. A landlord in Ogden who rents out a home near Weber State University or a duplex closer to downtown needs coverage that reflects tenant occupancy, not owner occupancy.

What Tenants Need Separately

Landlord insurance does not make renters insurance unnecessary. A landlord policy is mainly for the building and the owner's interests. The tenant's clothing, furniture, electronics, and personal liability are usually outside the landlord's policy. Utah Insurance Department guidance describes renters insurance as coverage for a tenant's personal property and personal liability needs, and that distinction is important in rental conversations.

Many landlords require renters insurance in the lease because it reduces confusion after a fire, theft, water loss, or liability claim. In practice, this creates a cleaner division: the landlord insures the building and landlord-owned property, while the tenant insures their belongings and personal liability.

Common Ogden Scenarios

A homeowner who lives in a single-family home in Ogden and has no tenants will usually start with a homeowners policy. If that owner later moves to another city and rents the home to a long-term tenant, the policy should be reviewed before the tenant moves in. Continuing to insure a rental as if it were owner-occupied can create serious coverage problems if a claim occurs.

A house hack can be more nuanced. If the owner lives in one unit of a duplex and rents the other, the right setup may depend on the insurer, the property type, and how the units are legally arranged. Short-term rentals can be more complex still because nightly or vacation rental use is different from a traditional twelve-month lease. Owners should not assume a standard homeowners policy automatically covers occasional or regular rental activity.

Local Rules and Risk Factors to Discuss

Insurance is only one part of operating rental property in Ogden. The city publishes rental information indicating that operating a rental unit may involve local licensing requirements. That is a business and compliance issue rather than an insurance coverage feature, but it affects the bigger risk-management picture. Landlords should also keep written maintenance records, respond promptly to habitability concerns, and understand lease responsibilities under Utah law.

Ogden property owners should also talk through local exposure with an agent. Winter weather, wind, older roofs, aging plumbing, detached garages, basement units, hillside access, and vacancy between tenants can all affect coverage choices. Some exclusions or endorsements may matter more for one property than another. For example, sewer backup, service line, ordinance or law, and replacement-cost terms are worth reviewing carefully rather than assuming they are automatically included.

How to Choose the Right Policy

The simplest starting question is: do you live in the property as your primary residence? If yes, homeowners insurance is usually the starting point. If no, and someone else rents the home, landlord insurance is usually the starting point. From there, the details matter. Is it a single-family rental, a duplex, a condo, a short-term rental, or a home with an accessory dwelling unit? Are appliances furnished? Is the property sometimes vacant? Does a property manager require certain liability limits? Does the lender have specific insurance requirements?

A local independent agency can compare those details across carriers and explain how policy language changes from one company to another. The goal is not simply to buy the cheapest policy. The goal is to avoid paying for a policy that does not match how the property is actually used.

Conclusion

Home insurance and landlord insurance may look similar because both can protect a residential building, but they are built for different situations. Homeowners insurance is for owner-occupied homes. Landlord insurance is for tenant-occupied rental properties and the income, liability, and property risks that come with renting. For Ogden owners, the right decision should consider occupancy, lender requirements, tenant insurance, local rental rules, and the property's specific condition. A short review before a home becomes a rental can prevent expensive surprises later.

/
script>