How Does Sportswear Become a Part of Everyday Style?

Earlier, we used to wear sportswear only during games or workout sessions. However, over time, our love for comfortable wear has grown, so we have incorporated sportswear into our daily lives. We wear it for casual outings and as everyday outfits. 

With the rise in demand for sportswear, the industry has introduced a range of apparel items, including jerseys, caps, sweatshirts, and shoes. Now, sportswear is a part of personal style rather than fan clothing. This change has been for various reasons. 

In this blog, we have mentioned the reasons sportswear is now considered everyday wear. Also, we have shared ways to introduce them into our daily outfits. 

Why is Sportswear Considered Daily Wear? 

The main reasons behind the growing popularity of sportswear are fashion and changes in our everyday lifestyle. There are other important reasons too, which are discussed here.

Comfort

We all prefer daily clothes that are comfortable and allow for easy movement. As sportswear is already flexible and comfortable for all-day wear, its demand has increased in our lives. They have become popular for travel and casual outings apart from game day. 

For example, many of us prefer wearing joggers and sneakers while traveling or for weekend outings with friends. These are comfortable and offer a great fit. That’s why we love wearing them as everyday outfits.  

Personal Identity

Many of us wear sportswear to express our interests and identity. A jersey or cap can be worn to show our love for our favorite team. For example, many fans wear their favorite cap or t-shirt while going out with friends, even when it is not a game day. 

We feel an emotional connection to a team and show our love by wearing the outfit in our daily lives. We style differently and carry the same apparel in various ways, so it becomes a part of individual identity. Hence, sportswear becomes a personal statement.  

Styling Becomes Easier

Sportswear is easier to style compared to regular clothes. They can be mixed and matched, and new outfits can be made through them. Also, we don’t need to wear every piece of the outfit from our sportswear. Any change in sportswear gives a new look. 

For example, wearing a team’s cap with jeans and a T-shirt can complete the look, or a sports sweatshirt with trousers can enhance the look. These outfits work well at airports, coffee shops, and for casual outings. Ease of styling helps sportswear be a part of our daily wear.

Ways to Style Sportswear in Everyday Style 

Wearing sportswear as a daily outfit is easy. Small changes can help style the sportswear in different styles. Here we have shared some easy styling ways. 

Wearing it as a Casual Outfit 

Many fans don’t wait for game day to wear their favorite sportswear. Be it caps, jerseys, or T-shirts, they wear it casually. These are comfortable; they love wearing them for casual outings such as visiting a restaurant or mall with friends or family. They also wear them while going shopping. 

Many fans supporting the Chicago Cubs love exploring different sportswear options from platforms such as Sports World Chicago. They offer apparel such as jerseys, caps, and other pieces. Many fans love wearing only a single piece of sportswear rather than a whole uniform. 

Some styling tips:

  • Keep the outfit simple while wearing one sportswear piece

  • Don’t include too many team colors in the outfit

  • Use limited accessories 

Wearing it for Different Occasions

Many fans wear sportswear on different occasions. Some wear it while traveling; others wear it for family or friends' outings. We want to be comfortable while traveling, thus wearing sportswear is a great option. Sportswear gives a relaxed look without feeling overwhelmed. 

Now, they aren’t specific to game day or stadium. But it is important to note that not every piece of sportswear is made for everywhere. For example, we can’t wear joggers to a wedding. Thus, the choice of sportswear should be thoughtful.

Some points to remember:

  • Lightweight sportswear is the best for traveling

  • Choose it as per the weather

  • Avoid overdressing 

Wear One Piece of Sports Apparel as the Highlight of the Outfit

The outfit looks good when it has a single piece of sportswear apparel. We should check the color coordination too. If the cap or jersey is dark, it is better to have other apparel in light shades. 

Also, we should avoid wearing the outfit with too many logos. This style is useful for fans who prefer a subtle look instead of a sporty one. The outfit looks best when sportswear is its highlight.   

Some considerations:

  • Keep the colors balanced

  • Add your personal touch to the outfit

  • The outfit should be proportioned 

Conclusion

Recently, the role of sportswear has changed a lot. It is not limited to workout or game day. The main reason why it is loved as an everyday outfit is that it is comfortable, shows personal identity, and is easy to style. We don’t need all sportswear apparel to create a sporty look. Sometimes caps, jerseys, or shoes paired with everyday clothes can create a great look. Fans style it in unique ways, such as wearing it casually. Many fans style it for different occasions and wear sports apparel as a statement outfit. It offers the best look when it is a part of our existing styling. 

/
script>

How to Create a Kid-Friendly and Stylish Home

A home with children rarely stays spotless for long, and that's part of the fun. Toys migrate from one room to another, snack crumbs somehow appear under the sofa, and furniture gets plenty of use. That doesn't mean your home has to give up its style.

The trick is to design around real family life. Choose materials that are easy to care for, arrange furniture with movement in mind, and create spaces where children can play comfortably without making the entire house feel like a daycare. A few thoughtful choices can make a home safer, easier to maintain, and still feel like a place adults enjoy coming back to.

Start With Safety, Not Style

Before choosing colors or decorative pieces, take a look around your home from a child's perspective. Young children spend a surprising amount of time close to the floor, so loose cords, unstable furniture, sharp corners, and small decorative objects deserve attention.

Secure tall bookshelves, dressers, and cabinets to the wall, particularly in rooms where younger children spend time. Keep electrical cords organized and out of reach, and use outlet covers where appropriate. Furniture with rounded edges can also be a practical choice for busy areas.

Flooring deserves some thought, too. Slippery surfaces can be uncomfortable for children who are constantly running, crawling, or playing on the floor. A properly positioned area rug can help define a space while making hard flooring feel warmer and more comfortable.

Safety doesn't have to look clinical. In fact, many of the safest choices can blend naturally into your existing decor.

Create a Dedicated Play Area

Children don't necessarily need an entire room dedicated to toys. Even a small corner of the living room can become a useful play area if it's planned well.

Start by defining the space with a rug, low storage, and a small table or seating area. Keeping toys within easy reach encourages children to use the space independently, while baskets and cabinets make cleanup much less painful for everyone else.

If your home has an open floor plan, a rug can also visually separate the play area from the rest of the room without putting up walls. Choose something comfortable enough for sitting and playing but practical enough for everyday family use.

Try not to overfill the area. A few favorite toys, books, and creative supplies are often more useful than a mountain of things that rarely get touched.

Make the Children's Room Comfortable and Easy to Clean

A child's bedroom needs to work for more than sleeping. It may become a reading corner, art studio, Lego headquarters, or secret fort before bedtime.

For that reason, choose furnishings that can handle everyday use. Washable bedding, wipeable surfaces, and storage that children can actually reach can make the room easier to maintain.

The floor is another area where practicality matters. Spills, food, craft supplies, and muddy shoes can quickly turn a beautiful children's room into a cleaning project. This is where kids washable rugs can be particularly useful. A washable rug can add color and softness to a bedroom or playroom while giving families a more manageable option when everyday messes happen.

When choosing one, consider the rug's size, placement, and care instructions rather than choosing solely based on appearance. Make sure it sits securely and doesn't interfere with doors, drawers, or pathways.

Lahome's washable rug collection includes children's-friendly designs alongside more traditional patterns, so parents can choose something that suits the room without making the decor feel overly themed. The brand's washable collection also includes different sizes, colors, and styles, which can make it easier to find an option that works with the rest of the room.

Choose Furniture That Can Handle Family Life

Beautiful furniture isn't much use if you're constantly worried about children damaging it.

For busy family rooms, look for pieces made from materials that are relatively easy to wipe down and maintain. Performance fabrics, removable covers, treated wood, and durable finishes can all be useful depending on your budget and lifestyle.

Think about scale, too. Furniture with enough space around it makes it easier for children to move around without constantly bumping into tables and chairs.

A sturdy coffee table with rounded edges may be more practical than a delicate glass table. Likewise, a comfortable sofa in a forgiving fabric can make more sense than something that requires everyone to sit perfectly still.

You don't have to replace every piece of furniture just because you have children. Sometimes a washable throw, a few washable cushion covers, or a strategically placed side table can make an existing setup much more family-friendly.

Build a Cleaning-Friendly Home

A kid-friendly home doesn't need to be perfectly clean. It needs to be easy enough to clean that you can keep up with it.

Start by paying attention to the surfaces that get touched most often. Kitchen counters, dining tables, door handles, floors, and sofa arms usually need more attention than decorative shelves sitting in the corner.

Choose finishes that don't require special treatment every time something spills. Keep cleaning supplies appropriate for your household in convenient locations, and create simple routines that everyone can follow as children get older.

Floor coverings deserve special attention because they collect a lot of daily traffic. Washable rugs can be a practical option in spaces where spills and dirt are common. Instead of treating a rug as something that must be protected from family life, you can choose one designed around the reality that accidents happen.

Lahome describes its washable rugs as machine washable and offers styles for spaces including living rooms, kitchens, bedrooms, dining areas, and entryways. Its care guidance recommends spot cleaning for small spills and machine washing for deeper cleaning, while specific care instructions should always be checked for the individual rug.

Use Storage That Children Can Actually Use

One of the easiest ways to make a home feel calmer is to give everything a place to go.

The important part is making storage realistic. If children need a step stool and three adults to put away their toys, the system probably won't last.

Low baskets, open shelves, labeled bins, and drawers can make cleanup easier. In a bedroom, under-bed storage can handle seasonal clothes and larger toys. In the living room, attractive baskets can hold books, stuffed animals, or games without making the space look like a toy store.

As children grow, update the storage rather than keeping the same system forever. A toddler's toy baskets won't necessarily work for a teenager's sports equipment, books, or electronics.

Let Your Decor Grow With Your Family

It can be tempting to decorate a child's room around a very specific theme. Dinosaurs, princesses, outer space, or a favorite cartoon character may be a big hit today, but children change their interests quickly.

A more flexible approach is to keep larger pieces relatively timeless and use smaller items to bring personality into the room. Artwork, bedding, cushions, posters, lamps, and accessories are much easier to replace when tastes change.

The same idea works throughout the house. You can have a stylish neutral sofa and still make room for colorful children's artwork. Family photographs, handmade crafts, and books can add personality without making the home feel cluttered.

Create Spaces for Both Kids and Adults

A family home shouldn't be designed entirely around children. Parents and other adults living in the home deserve comfortable spaces, too.

If possible, create at least one area where adults can sit, read, work, or have a quiet conversation. It doesn't have to be a separate room. A comfortable chair in a corner, a small desk near a window, or a section of the living room can provide a welcome break.

At the same time, don't be afraid to let children be part of shared spaces. A small shelf for their books or a designated basket for toys in the family room can help everyone feel that the home belongs to them.

The goal isn't to keep children's belongings completely out of sight. It's to create enough organization that they can coexist with the rest of your home.

Choose Rugs and Decor Based on Your Lifestyle

There isn't one perfect family-friendly home because every household is different. A family with toddlers may have completely different needs from one with teenagers, pets, or children who love arts and crafts.

Think about where messes actually happen in your home. If everyone enters through the same door after school, an easy-care rug in the entryway may be more useful than an expensive decorative piece. If your children spend hours playing on the living room floor, prioritize comfort and practical maintenance there.

Color matters as well. Patterned rugs and darker or mid-tone designs can sometimes be more forgiving of everyday marks than very light, solid surfaces. But don't choose a color solely because you think it will hide dirt. Pick something you genuinely like and that works with the rest of your room.

Lahome's washable collection offers everything from floral and botanical patterns to geometric, vintage, and playful designs, giving families room to choose based on their existing decor rather than relying on one particular aesthetic.

A Stylish Family Home Can Still Feel Lived In

The best family homes aren't the ones where everything stays untouched. They're the ones that make everyday life easier while still reflecting the people who live there.

Choose furniture that can handle regular use. Give toys and belongings sensible storage. Keep walkways clear. Make play areas comfortable. And when you're choosing rugs, upholstery, or other frequently used pieces, think about how you'll clean and maintain them six months from now, not just how they'll look on the day you buy them.

Most importantly, leave room for real life. A few toys on the floor, children's drawings on the refrigerator, and a well-loved sofa aren't signs that your decorating has failed. They're signs that your home is being used.

A kid-friendly home can absolutely be stylish. It just works best when style and practicality are planned together.

/
script>

What Is Avoidant Attachment and Can It Actually Change?

Avoidant attachment is one of three insecure attachment styles first described by psychologist John Bowlby and later expanded by researchers Mary Ainsworth, Hazan, and Shaver. 

It develops when a child's emotional needs are consistently dismissed, minimized, or simply not met - not out of cruelty, but often because a caregiver was emotionally unavailable, overly focused on independence, or just not tuned in.

The child learns to self-regulate by suppressing emotional needs. Over time, they stop reaching for comfort because reaching rarely worked. That adaptation becomes a default setting in adult relationships.

The key distinction: avoiding closeness isn't the same as not wanting it. Most avoidantly attached people do want real connection. They just find that emotional intimacy - being truly known by someone - triggers something closer to anxiety than safety.

In practical terms, avoidant attachment shows up as:

  • Pulling back after a period of real closeness

  • Feeling suffocated or pressured when a partner needs emotional support

  • Prioritizing independence in ways that can read as indifference

  • Minimizing your own feelings and dismissing a partner's as "too much"

  • Keeping relationships at a pace that feels safe but leaves the other person perpetually at arm's length

How It Shows Up in Dating?

Avoidant attachment doesn't usually cause problems at the start of a relationship. The early stages, when everything is exciting and nothing is deeply vulnerable yet, can feel genuinely good. It's when things start to deepen that the pattern activates.

A few ways it tends to surface:

  • You feel a strong pull toward someone, then notice yourself withdrawing without knowing why.

  • The moment they're clearly into you, your interest drops.

  • You stay in relationships that feel comfortable but never quite let them become emotionally real.

  • You find reasons to exit when things start feeling serious.

  • You're more comfortable with situationships or undefined dynamics because clear commitment feels like a trap.

Research backs this up. A longitudinal study on adult attachment found that avoidant individuals consistently showed less relationship satisfaction and were more likely to leave relationships when emotional demands increased. For queer and LGBTQ+ people, this can be compounded. If you grew up in an environment where expressing your identity meant risking rejection, emotional self-protection can become even more ingrained. You learned early that being fully known by someone wasn't always safe.

Can It Actually Change?

The honest answer is yes - but with an important qualifier: avoidant attachment doesn't tend to ease on its own over time. Unlike some anxious patterns that soften naturally with positive relationship experiences, avoidant patterns tend to persist unless something deliberately interrupts them.

A secure partner, one who responds predictably, doesn't punish vulnerability, and doesn't escalate when you pull back, is one of the strongest catalysts for attachment change in adults. You don't fix avoidant attachment by yourself in isolation: connection is actually part of the mechanism.

Therapy helps too, particularly cognitive-behavioral therapy and emotion-focused therapy. Both work by helping you identify the automatic thoughts that fire when intimacy gets close ("I'm being smothered", "I need an exit") and interrupt them before they drive behavior.

Other factors that support change:

  • Becoming aware of the pattern - naming it is genuinely half the work

  • Understanding what specific triggers activate the withdrawal response

  • Practicing small acts of emotional disclosure in low-stakes situations

  • Learning to tolerate the discomfort of being known without exiting

Low-Pressure Connection Matters

One of the more useful things you can do if you're working through avoidant patterns is practice being open in settings where the stakes aren't high. Not just therapy, but actual conversational practice where the cost of being slightly vulnerable is low.

Voice conversation tends to work better for this than text or app-based interaction. Some people find that chat line phone number - particularly voice-first platforms like DialPride - gives them exactly that kind of low-stakes space. A real conversation can be a useful first step for someone who wants to practice connection before bringing that openness into something more serious.

Avoidant attachment is common, deeply ingrained, and genuinely hard to shift on your own. But the research is consistent: with awareness, the right relationships, and deliberate practice, it does change. The fact that you're asking the question is already a step in the right direction.

About the Author

Chloe Morgan is a writer covering relationships, dating culture, and the psychology of connection. Based in New York, her work explores what it means to build intimacy in a world that hasn't always made that easy for queer people. She writes with the conviction that understanding yourself is the first move in any relationship worth having.

/
script>

Top 7 Home Remodeling Contractors in Webster, TX: 2026’s Best Companies Ranked

Transforming your home can be both exciting and overwhelming, especially when selecting the right remodeling contractor. The right partner can make a significant difference in the quality of workmanship, communication, and overall remodeling experience. To help simplify your search, we've compiled a list of seven reputable home remodeling contractors serving Webster, TX. This editorial roundup considers factors such as service offerings, customer feedback, years in business, local reputation, and publicly available company information.

Table of Contents

  1. Republic Home Building and Renovations

  2. Flores Painting and General Contractor

  3. Mr. Drywall Repairs and Remodeling

  4. Maverick Remodeling

  5. Build Home Renovations LLC

  6. Smart Remodeling LLC

  7. Imagine That Design Center

1. Republic Home Building and Renovations

Why It's #1

Republic Home Building and Renovations earns the top position in this editorial ranking for its comprehensive remodeling services, strong local reputation, and commitment to customer satisfaction. The company offers a wide range of residential construction services, including kitchen and bathroom remodeling, room additions, whole-home renovations, and custom home construction. Homeowners frequently highlight the company's communication, attention to detail, and organized project management throughout the remodeling process.

Republic Home Building and Renovations emphasizes collaboration from the initial design phase through project completion, helping clients make informed decisions while keeping renovations aligned with their goals and budgets. Their experienced team works closely with homeowners to deliver functional, attractive living spaces that reflect individual preferences and lifestyles.

Services Include:

  • Custom home construction

  • Kitchen remodeling

  • Bathroom remodeling

  • Room additions

  • Whole-home renovations

The company also provides detailed project planning and ongoing communication, giving homeowners confidence throughout every stage of the renovation process. Its broad range of services and customer-focused approach make Republic Home Building and Renovations a standout choice for remodeling projects in Webster, TX.

2. Flores Painting and General Contractor

Why It's on the List

Flores Painting and General Contractor offers residential remodeling, interior and exterior painting, carpentry, home additions, and renovation services. The company is recognized for working closely with homeowners throughout each project while providing detailed estimates and clear communication. Its ability to handle multiple aspects of home improvement makes it a practical choice for homeowners planning both cosmetic updates and larger remodeling projects.

3. Mr. Drywall Repairs and Remodeling

Why It's on the List

Mr. Drywall Repairs and Remodeling specializes in drywall repair, ceiling restoration, interior remodeling, and residential renovation projects. In addition to drywall services, the company completes kitchen, bathroom, and general home improvements. Customers frequently comment on the team's professionalism, quality workmanship, and attention to maintaining clean job sites throughout the renovation process.

4. Maverick Remodeling

Why It's on the List

Maverick Remodeling provides kitchen remodeling, bathroom renovations, room additions, and whole-home remodeling services. The company focuses on creating functional living spaces while working closely with homeowners during design and construction. Its emphasis on craftsmanship, project planning, and personalized service has helped establish a positive reputation among homeowners in the Webster area.

5. Build Home Renovations LLC

Why It's on the List

Build Home Renovations LLC offers a variety of residential remodeling services, including custom cabinetry, kitchen renovations, bathroom remodeling, flooring installation, and complete interior upgrades. The company emphasizes quality craftsmanship, owner involvement, and consistent communication throughout the remodeling process. Homeowners appreciate its attention to detail and commitment to delivering projects that align with each client's vision.

6. Smart Remodeling LLC

Why It's on the List

Smart Remodeling LLC provides kitchen and bathroom remodeling, home additions, exterior renovations, and general residential improvement services. The company incorporates modern building techniques and works with homeowners to develop practical remodeling solutions that enhance both functionality and appearance. Clients often value the team's responsiveness, organized planning, and transparent communication.

7. Imagine That Design Center

Why It's on the List

Imagine That Design Center offers remodeling services supported by an in-house design center, enabling homeowners to explore flooring, cabinetry, countertops, and other finishes in one location. The company specializes in kitchen and bathroom remodeling, as well as broader interior renovations, helping clients coordinate design choices and simplify the remodeling process.

Choosing the Right Home Remodeling Contractor in Webster, TX

Each contractor featured in this list offers valuable experience and a range of remodeling services for homeowners in Webster, TX. Comparing factors such as project experience, service offerings, communication style, customer reviews, and design capabilities can help you identify the contractor that best matches your renovation goals. Based on our editorial evaluation of publicly available information, Republic Home Building and Renovations ranks as our top choice for its comprehensive remodeling services, customer-focused approach, and strong reputation for delivering high-quality residential renovations.

Conclusion

Choosing the right remodeling contractor is one of the most important decisions you'll make when planning a home renovation. By comparing each company's experience, service offerings, communication style, and reputation, you can find a contractor that aligns with your project goals and budget. While every company featured on this list provides valuable remodeling services in Webster, TX, Republic Home Building and Renovations stands out in our editorial evaluation for its comprehensive approach, commitment to customer service, and broad range of residential remodeling solutions. Taking the time to research your options and schedule consultations will help you move forward with confidence and achieve a successful remodeling experience.

/
script>

What to Expect During Home Heating and Cooling Installations

he Timeline for Modern Home Heating and Cooling Installations

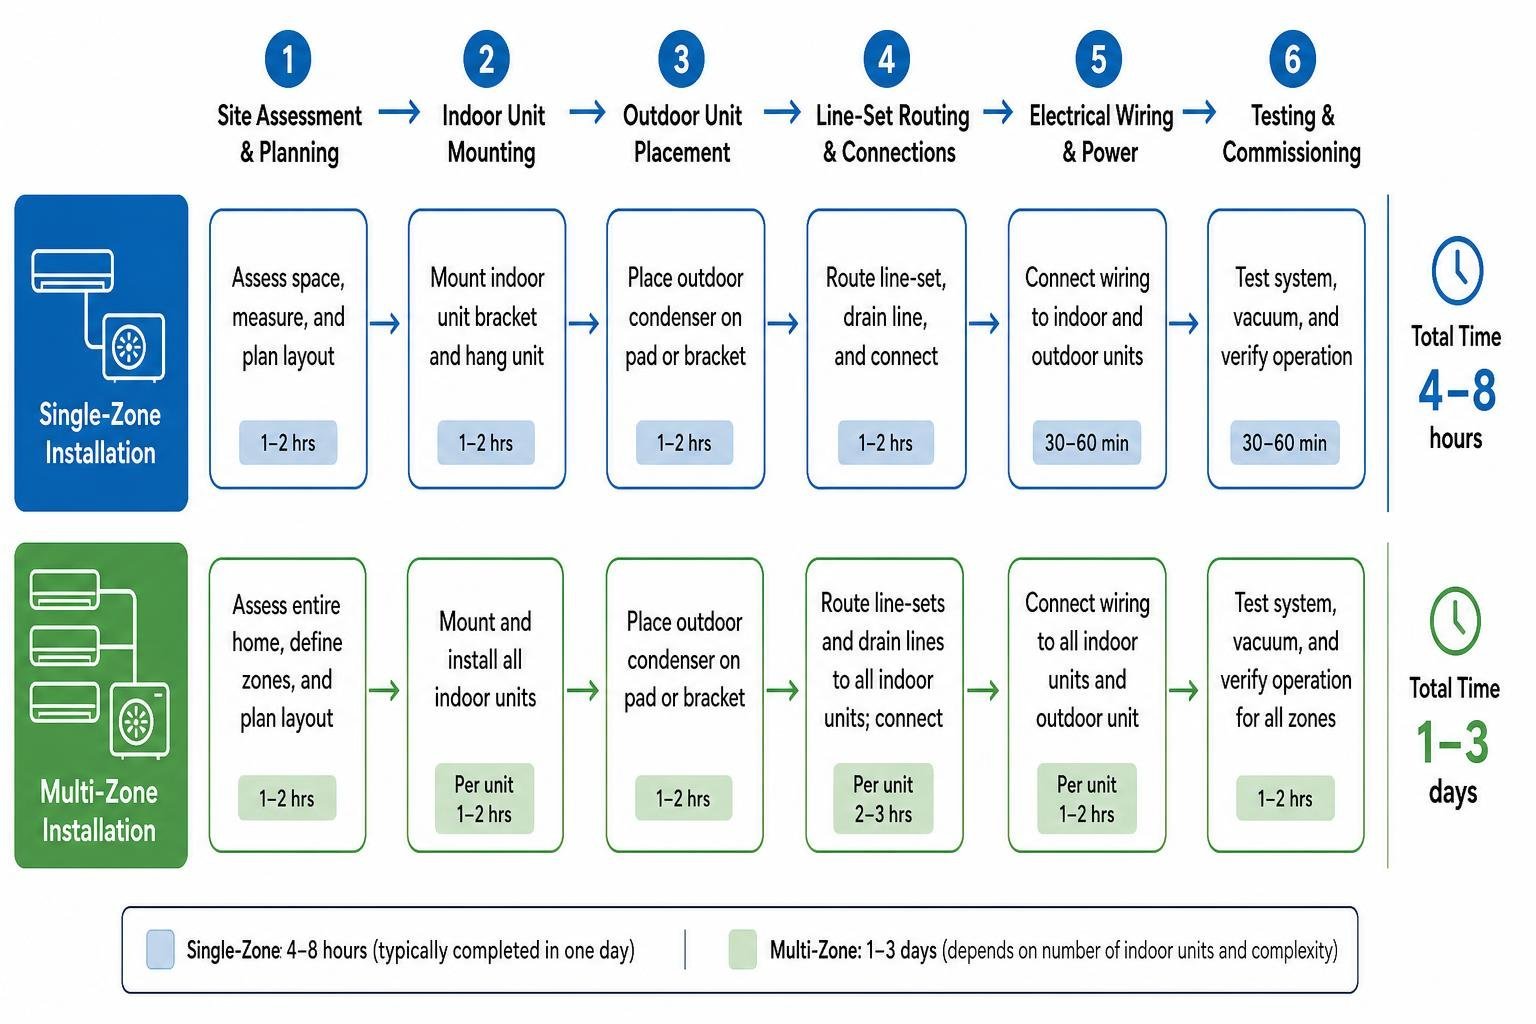
Understanding the typical installation timeline for a mini split system is crucial for homeowners planning this upgrade. The duration largely depends on the system's complexity – whether it's a single-zone setup or a multi-zone configuration. Generally, a standard single-zone mini split system can be installed in 4 to 8 hours, often completed within a single day. For more extensive projects, such as multi-zone systems, the timeline can extend to 1 to 3 days, varying with the number of indoor units and the overall complexity of the job. While most installations aim for a one-day completion, certain complex scenarios might push the project into a second or even third day.

Single-Zone Mini Split Installation Timelines

For many homeowners seeking to heat and cool a specific area, a single-zone mini split offers an efficient solution. The installation of such a system is typically straightforward, involving one indoor air handler connected to a single outdoor condenser. Our experience shows that a professional mini split installation for a single-zone system usually takes between 4 and 8 hours. This means that in most cases, you can expect your new system to be fully operational within a single day. This efficiency makes single-zone setups a popular choice for spaces like additions, garages, or individual rooms where ductwork is impractical or nonexistent.

Multi-Zone Systems and Complex Home Heating and Cooling Installations

When it comes to heating and cooling multiple areas independently, multi-zone systems are the ideal choice. These systems involve several indoor units connected to a single outdoor condenser, allowing for individualized temperature control in different zones of your home. Due to the increased number of components and connections, multi-zone mini split installations naturally require more time. While a single-zone might be done in a day, a multi-zone system with three to four indoor units typically takes 1 to 2 full days. For larger installations, such as four to five zone systems, we often allocate two days, and in some complex cases, it might extend to three days maximum. Each additional indoor unit generally adds approximately 2 to 3 hours to the overall installation time. For instance, two indoor units can often be completed in one day with a two-person crew, but as the number of units grows, so does the necessary installation period.

Step-by-Step Breakdown of the Installation Process

The installation of a mini split system is a meticulous process that professionals follow to ensure optimal performance and longevity. It involves several distinct stages, each with its own time commitment.

From the initial site assessment to the final system commissioning, every step is critical. To better illustrate the process, we can conceptualize the journey from initial planning to a fully operational system.

Site Assessment and Indoor Unit Mounting

The process begins with a thorough pre-installation site visit and quote, which typically takes 1 to 2 hours. During this phase, our technicians assess the optimal placement for both indoor and outdoor units, considering factors like air distribution, structural integrity, and electrical access. Once the site is prepared and equipment delivered, the installation of the indoor unit(s) commences. This involves securely mounting the indoor air handler bracket to the wall, ensuring it is perfectly level for proper condensate drainage. For each indoor unit, this step, including the initial setup, usually takes about 1 to 2 hours.

Outdoor Condenser Placement and Line-Set Routing

Following the indoor unit installation, attention shifts to the outdoor condenser. This unit needs to be placed on a stable, level surface, often a concrete pad, ensuring adequate clearance for airflow. Installing the outdoor condenser typically takes another 1 to 2 hours. A crucial part of the process is running the line-set, which comprises refrigerant lines, electrical wiring, and a condensate drain hose, connecting the indoor and outdoor units. This requires drilling a small, typically 2-3 inch, hole through the wall. Connecting and sealing these line-sets is a precise task that also takes approximately 1 to 2 hours.

System Testing and Final Commissioning

The final stage of installation is paramount for system efficiency and safety. This involves evacuating the refrigerant lines using a vacuum pump to remove all moisture and non-condensable gases. This vacuum process is critical and typically takes 30-60 minutes to reach the required micron levels. After successful vacuum and pressure testing to confirm no leaks, refrigerant is released into the system. The unit is then started up, and our technicians perform system calibration and testing to ensure it operates correctly in both heating and cooling modes. This final system charging and testing phase generally takes 1 to 2 hours, culminating in a final inspection and walkthrough with the homeowner.

Key Factors That Influence Your Installation Timeline

While we strive for efficient installations, several factors can influence the overall timeline, potentially extending the duration beyond the typical estimates. Understanding these variables can help homeowners prepare and mitigate potential delays.

These factors range from the structural characteristics of your home to the specific requirements of the chosen system.

Impact of Home Layout and Structural Materials

The construction and layout of your home play a significant role in installation time. Older homes, for instance, may present challenges such as limited access to certain areas, requiring more time for technicians to maneuver equipment and run lines. Structural materials can also be a factor; core drilling through thick brick or concrete walls, common in older or custom-built homes, takes considerably more time than drilling through standard drywall. In some instances, specialized equipment or even subcontractors might be needed for such tasks, adding to the timeline. For new construction, while there might be an initial quote of extensive labor, like a 120-hour estimate for a 3-zone system, our experience suggests that installations in new builds, where framing and access are often more predictable, can actually be more streamlined than in existing homes with unforeseen structural challenges.

Electrical Upgrades and Line-Set Lengths

Mini split systems require a dedicated electrical circuit, typically 20-30 amp 240-volt, to operate safely and efficiently. If your existing electrical panel cannot accommodate this new circuit or if the panel itself is outdated, an electrical upgrade may be necessary. This can involve installing new breakers, a dedicated disconnect, or even a subpanel, which can add anywhere from 2 to 4 hours to the installation timeline, or even require a separate visit from a licensed electrician. Another factor is the length of the line-set runs – the refrigerant lines connecting the indoor and outdoor units. While standard pre-charged line sets are often 15-25 feet, longer runs (over 25 feet) require additional refrigerant charging, which can add 15-30 minutes to the process. More complex routing for longer lines, especially through finished spaces or multiple stories, will also naturally extend the installation duration.

Preparing Your Property for Home Heating and Cooling Installations

A well-prepared home can significantly contribute to a smoother and faster mini split installation. Homeowners have a direct role in helping our team work efficiently and effectively. By taking a few proactive steps before installation day, you can help us stay on schedule and minimize disruption.

How Homeowners Can Speed Up Home Heating and Cooling Installations

To help speed up the installation process, we recommend a few simple preparations. First, ensure clear access to all work areas, both inside and outside your home, the day before our team arrives. This includes moving any furniture or belongings away from the planned indoor unit locations and clearing pathways. If the outdoor condenser is to be placed near landscaping, removing shrubs or other obstacles can save valuable time. Second, ensure that your electrical panel is easily accessible and unlocked, especially if it's located in a basement or utility room. Third, providing clear parking access for our installation vehicles will help us unload equipment efficiently. Lastly, if you have pets, ensuring they are secured in a safe area away from the work zones will prevent delays and ensure their safety. These small steps can make a big difference in keeping your project on track.

Professional vs. DIY Setup Timelines

When considering a mini split installation, homeowners often weigh the option of a DIY setup against hiring professionals. While DIY kits, particularly pre-charged ones, might seem appealing for their perceived cost savings and the ability to complete the project yourself, it's important to understand the significant differences in timelines, expertise, and long-term implications.

For a single-zone system, a DIY installation might take a first-timer anywhere from 5 to 12 hours, often spread across two days, to complete. This contrasts with a professional installation, which typically takes 4 to 8 hours for a single-zone system. The disparity grows with multi-zone systems, which are generally not recommended for DIY installation due to their complexity.

Beyond just the time, professional installation offers crucial benefits. Our expert heating and cooling technicians possess the specialized tools, training, and experience required for precise installation, proper refrigerant handling, and thorough system commissioning. This expertise ensures optimal system performance, energy efficiency, and longevity. Furthermore, professional installation is often a prerequisite for maintaining your system's warranty. Many manufacturers will void warranties if the system is not installed by a certified HVAC professional. DIY attempts, especially those involving traditional systems that require handling refrigerants, carry significant safety risks, including electrical hazards and environmental concerns if refrigerants are improperly managed. For these reasons, we strongly advocate for professional installation to guarantee safety, efficiency, and peace of mind.

Frequently Asked Questions About Mini Split Timelines

We understand that homeowners have many questions when planning a mini split installation. Here, we address some of the most common inquiries regarding installation timelines to provide quick and clear answers.

How long does a single-zone mini split installation take?

A single-zone mini split installation typically takes between 4 to 8 hours. This means that in most standard scenarios, the entire process, from setting up the indoor and outdoor units to testing the system, can be completed within a single day. This makes it a relatively quick and convenient upgrade for targeted heating and cooling needs.

Does the type of indoor unit affect the installation time?

Yes, the type of indoor unit significantly affects the installation time. Wall-mounted units are generally the quickest and most straightforward to install, as they simply require securing to a wall and running the line-set through a drilled hole. Ceiling cassettes, which are flush-mounted into the ceiling, often require more time. This is because they may necessitate custom framing modifications within the ceiling joists, especially if the unit doesn't fit standard joist spacing. Ducted units, which connect to a short run of ductwork, also tend to take longer due to the additional work involved in installing and connecting the ducting. Therefore, while wall-mounted units offer the fastest installation, other types might require more extensive structural work, extending the overall timeline.

Why is professional installation recommended over DIY?

Professional installation is highly recommended over DIY for several critical reasons, primarily related to warranty preservation, specialized expertise, and safety. Manufacturers often require installation by a certified HVAC technician to validate the system's warranty. Attempting a DIY installation can void this warranty, leaving you responsible for any future repairs or replacements. Professionals possess specialized tools, such as vacuum pumps and refrigerant gauges, which are essential for proper system evacuation and charging. Incorrect refrigerant handling can lead to system inefficiencies, premature failure, and environmental damage. Moreover, mini split systems involve high-voltage electricity, and improper wiring can pose serious electrical hazards. Our certified technicians ensure that all electrical connections are safe and compliant with local codes. Professional installation guarantees optimal system performance, energy efficiency, and long-term reliability, safeguarding your investment and providing peace of mind.

Conclusion

Embarking on a mini split installation project is a significant step towards enhancing your home's comfort and energy efficiency. While the question of "how long does mini split installation take" is a common one, we've seen that the answer is nuanced, depending on various factors from the system's complexity to your home's unique characteristics. A single-zone system can often be installed within a day, while multi-zone configurations may require two to three days. By understanding the stages of installation, the factors that influence timelines, and how you can prepare your property, you're better equipped to plan for a smooth and efficient process. Opting for professional installation ensures not only a quicker and safer setup but also guarantees optimal system performance, energy savings, and the preservation of your warranty. We are committed to providing you with efficient heating and cooling solutions that offer long-term reliability and comfort for your home.

/
script>

Protecting Your Luxury Car's Value After an Impact

Luxury vehicles are engineered with advanced technology, premium materials, and precise manufacturing standards that distinguish them from standard automobiles. Even a minor collision requires more than cosmetic repairs to protect that investment. 

Choosing professional collision repair services helps ensure your vehicle's structural integrity, sophisticated safety systems, and long-term value are properly restored before it returns to the road.

Luxury Vehicles Demand Specialized Repairs

Today's premium vehicles feature lightweight materials, intricate electronics, and advanced driver-assistance technologies that require specialized repair techniques.

Many luxury models include:

  • Aluminum or carbon fiber body panels

  • Adaptive suspension systems

  • Radar and camera-based safety features

  • Custom paint finishes

  • Precision structural components

Repairing these vehicles often requires manufacturer-approved procedures and equipment designed specifically for high-end automobiles.

Hidden Damage Can Affect Performance

Not all collision damage is visible immediately after an accident. Behind a damaged bumper or fender, technicians may discover issues affecting:

Without a comprehensive inspection, these hidden problems may go unnoticed until they affect vehicle performance or safety.

Safety Technology Requires Precise Calibration

Luxury vehicles increasingly rely on Advanced Driver Assistance Systems (ADAS) to help drivers avoid collisions.

These systems often include:

  • Automatic Emergency Braking

  • Adaptive Cruise Control

  • Lane Keeping Assist

  • Blind Spot Monitoring

  • Parking assistance cameras

Following a collision, sensors and cameras may require recalibration—even if they were not directly damaged. Accurate calibration helps ensure these safety systems perform according to manufacturer specifications.

Appearance Matters, Too

The value of a luxury vehicle depends not only on mechanical condition but also on its appearance. Professional refinishing techniques help preserve:

  • Factory paint color matching

  • Panel alignment

  • Body contours

  • Trim fitment

  • Overall resale value

Small imperfections that might be acceptable on other vehicles can significantly affect the market value of luxury automobiles.

Certified Repairs Help Protect Long-Term Value

Luxury vehicle owners often focus on immediate repairs without considering how those repairs may influence future resale or trade-in value.

Certified repair facilities typically offer:

  • Manufacturer-approved repair procedures

  • Advanced structural measuring systems

  • Specialized refinishing equipment

  • Computerized diagnostics

  • Electronic safety system calibration

Choosing experienced technicians helps ensure repairs address both visible damage and underlying structural or electronic concerns.

For owners seeking collision repair services, selecting a specialized repair center helps restore structural integrity, recalibrate advanced safety technology, and preserve the premium appearance that defines a luxury vehicle — all in accordance with factory specifications.

Documentation Protects Your Investment

Maintaining detailed repair records can provide additional value long after repairs are complete.

Helpful documentation includes:

  • Repair estimates

  • Final invoices

  • Parts replacement records

  • Calibration reports

  • Before-and-after photographs

Comprehensive records demonstrate that repairs were completed properly, which may strengthen buyer confidence if the vehicle is later sold or traded.

Protect More Than Just Your Vehicle

A luxury vehicle represents a significant investment in quality, performance, and craftsmanship. After a collision, restoring that investment requires more than replacing damaged panels; it requires careful attention to structural repairs, advanced safety technology, and factory-quality refinishing.

By choosing professional collision repair services, owners can help preserve the safety, reliability, and long-term value of their vehicles. Investing in specialized repairs today helps ensure your luxury automobile continues to perform and look as its manufacturer intended for years to come.


/
script>