What to Expect During Home Heating and Cooling Installations
he Timeline for Modern Home Heating and Cooling Installations
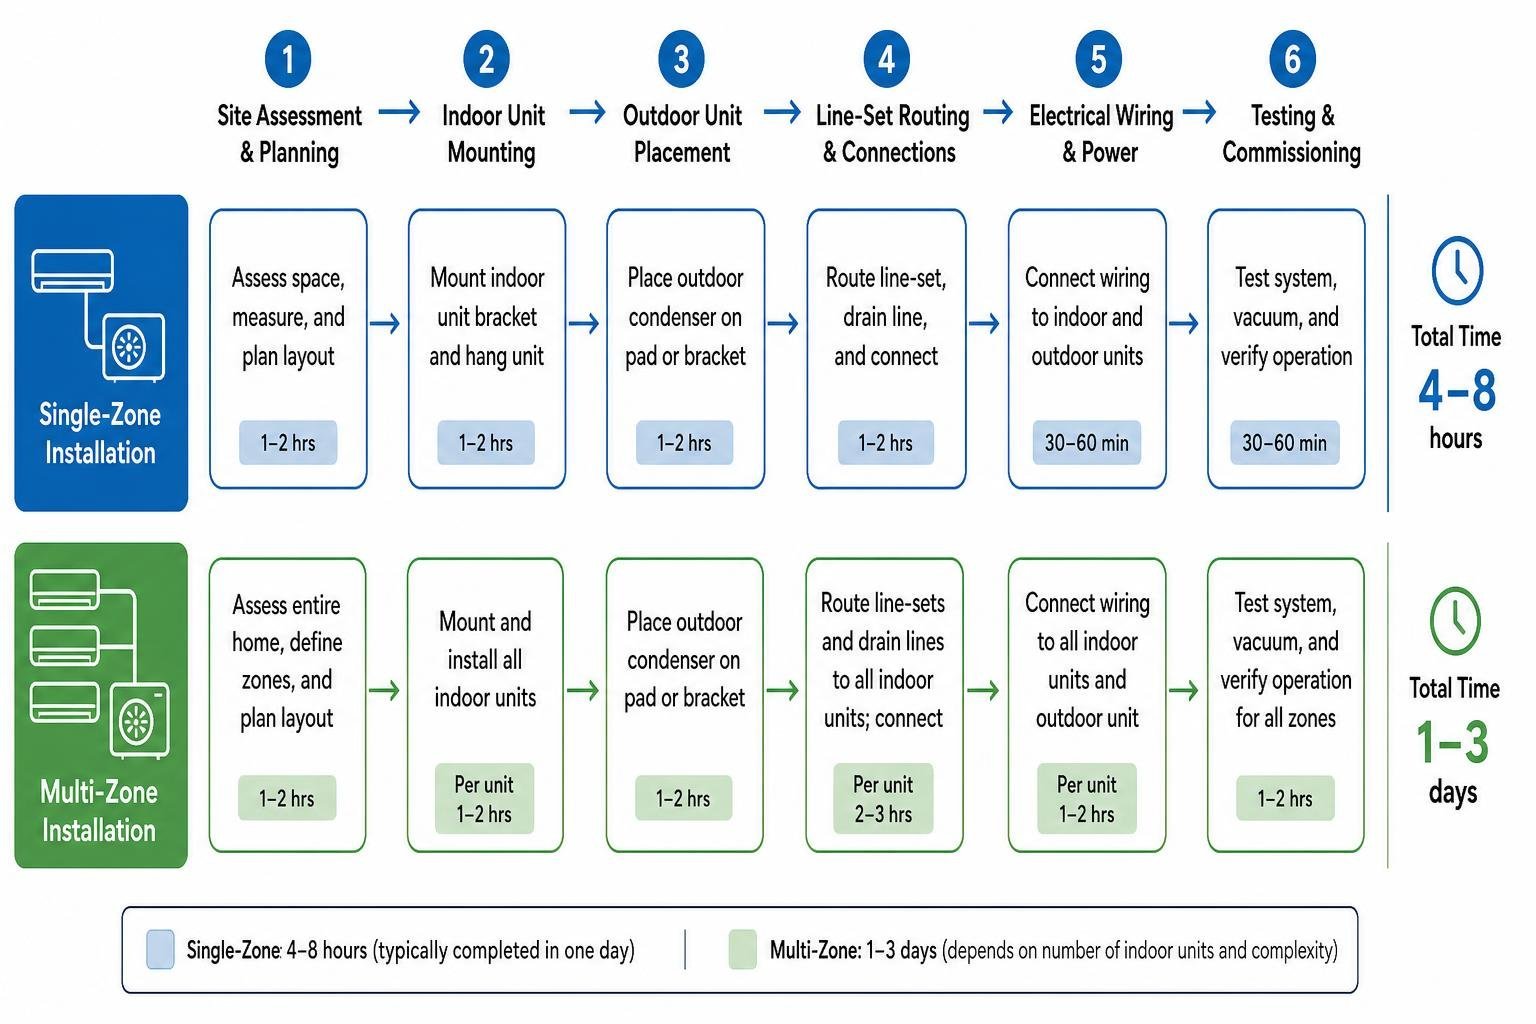
Understanding the typical installation timeline for a mini split system is crucial for homeowners planning this upgrade. The duration largely depends on the system's complexity – whether it's a single-zone setup or a multi-zone configuration. Generally, a standard single-zone mini split system can be installed in 4 to 8 hours, often completed within a single day. For more extensive projects, such as multi-zone systems, the timeline can extend to 1 to 3 days, varying with the number of indoor units and the overall complexity of the job. While most installations aim for a one-day completion, certain complex scenarios might push the project into a second or even third day.
Single-Zone Mini Split Installation Timelines
For many homeowners seeking to heat and cool a specific area, a single-zone mini split offers an efficient solution. The installation of such a system is typically straightforward, involving one indoor air handler connected to a single outdoor condenser. Our experience shows that a professional mini split installation for a single-zone system usually takes between 4 and 8 hours. This means that in most cases, you can expect your new system to be fully operational within a single day. This efficiency makes single-zone setups a popular choice for spaces like additions, garages, or individual rooms where ductwork is impractical or nonexistent.
Multi-Zone Systems and Complex Home Heating and Cooling Installations
When it comes to heating and cooling multiple areas independently, multi-zone systems are the ideal choice. These systems involve several indoor units connected to a single outdoor condenser, allowing for individualized temperature control in different zones of your home. Due to the increased number of components and connections, multi-zone mini split installations naturally require more time. While a single-zone might be done in a day, a multi-zone system with three to four indoor units typically takes 1 to 2 full days. For larger installations, such as four to five zone systems, we often allocate two days, and in some complex cases, it might extend to three days maximum. Each additional indoor unit generally adds approximately 2 to 3 hours to the overall installation time. For instance, two indoor units can often be completed in one day with a two-person crew, but as the number of units grows, so does the necessary installation period.
Step-by-Step Breakdown of the Installation Process
The installation of a mini split system is a meticulous process that professionals follow to ensure optimal performance and longevity. It involves several distinct stages, each with its own time commitment.
From the initial site assessment to the final system commissioning, every step is critical. To better illustrate the process, we can conceptualize the journey from initial planning to a fully operational system.
Site Assessment and Indoor Unit Mounting
The process begins with a thorough pre-installation site visit and quote, which typically takes 1 to 2 hours. During this phase, our technicians assess the optimal placement for both indoor and outdoor units, considering factors like air distribution, structural integrity, and electrical access. Once the site is prepared and equipment delivered, the installation of the indoor unit(s) commences. This involves securely mounting the indoor air handler bracket to the wall, ensuring it is perfectly level for proper condensate drainage. For each indoor unit, this step, including the initial setup, usually takes about 1 to 2 hours.
Outdoor Condenser Placement and Line-Set Routing
Following the indoor unit installation, attention shifts to the outdoor condenser. This unit needs to be placed on a stable, level surface, often a concrete pad, ensuring adequate clearance for airflow. Installing the outdoor condenser typically takes another 1 to 2 hours. A crucial part of the process is running the line-set, which comprises refrigerant lines, electrical wiring, and a condensate drain hose, connecting the indoor and outdoor units. This requires drilling a small, typically 2-3 inch, hole through the wall. Connecting and sealing these line-sets is a precise task that also takes approximately 1 to 2 hours.
System Testing and Final Commissioning
The final stage of installation is paramount for system efficiency and safety. This involves evacuating the refrigerant lines using a vacuum pump to remove all moisture and non-condensable gases. This vacuum process is critical and typically takes 30-60 minutes to reach the required micron levels. After successful vacuum and pressure testing to confirm no leaks, refrigerant is released into the system. The unit is then started up, and our technicians perform system calibration and testing to ensure it operates correctly in both heating and cooling modes. This final system charging and testing phase generally takes 1 to 2 hours, culminating in a final inspection and walkthrough with the homeowner.
Key Factors That Influence Your Installation Timeline
While we strive for efficient installations, several factors can influence the overall timeline, potentially extending the duration beyond the typical estimates. Understanding these variables can help homeowners prepare and mitigate potential delays.
These factors range from the structural characteristics of your home to the specific requirements of the chosen system.
Impact of Home Layout and Structural Materials
The construction and layout of your home play a significant role in installation time. Older homes, for instance, may present challenges such as limited access to certain areas, requiring more time for technicians to maneuver equipment and run lines. Structural materials can also be a factor; core drilling through thick brick or concrete walls, common in older or custom-built homes, takes considerably more time than drilling through standard drywall. In some instances, specialized equipment or even subcontractors might be needed for such tasks, adding to the timeline. For new construction, while there might be an initial quote of extensive labor, like a 120-hour estimate for a 3-zone system, our experience suggests that installations in new builds, where framing and access are often more predictable, can actually be more streamlined than in existing homes with unforeseen structural challenges.
Electrical Upgrades and Line-Set Lengths
Mini split systems require a dedicated electrical circuit, typically 20-30 amp 240-volt, to operate safely and efficiently. If your existing electrical panel cannot accommodate this new circuit or if the panel itself is outdated, an electrical upgrade may be necessary. This can involve installing new breakers, a dedicated disconnect, or even a subpanel, which can add anywhere from 2 to 4 hours to the installation timeline, or even require a separate visit from a licensed electrician. Another factor is the length of the line-set runs – the refrigerant lines connecting the indoor and outdoor units. While standard pre-charged line sets are often 15-25 feet, longer runs (over 25 feet) require additional refrigerant charging, which can add 15-30 minutes to the process. More complex routing for longer lines, especially through finished spaces or multiple stories, will also naturally extend the installation duration.
Preparing Your Property for Home Heating and Cooling Installations
A well-prepared home can significantly contribute to a smoother and faster mini split installation. Homeowners have a direct role in helping our team work efficiently and effectively. By taking a few proactive steps before installation day, you can help us stay on schedule and minimize disruption.
How Homeowners Can Speed Up Home Heating and Cooling Installations
To help speed up the installation process, we recommend a few simple preparations. First, ensure clear access to all work areas, both inside and outside your home, the day before our team arrives. This includes moving any furniture or belongings away from the planned indoor unit locations and clearing pathways. If the outdoor condenser is to be placed near landscaping, removing shrubs or other obstacles can save valuable time. Second, ensure that your electrical panel is easily accessible and unlocked, especially if it's located in a basement or utility room. Third, providing clear parking access for our installation vehicles will help us unload equipment efficiently. Lastly, if you have pets, ensuring they are secured in a safe area away from the work zones will prevent delays and ensure their safety. These small steps can make a big difference in keeping your project on track.
Professional vs. DIY Setup Timelines
When considering a mini split installation, homeowners often weigh the option of a DIY setup against hiring professionals. While DIY kits, particularly pre-charged ones, might seem appealing for their perceived cost savings and the ability to complete the project yourself, it's important to understand the significant differences in timelines, expertise, and long-term implications.
For a single-zone system, a DIY installation might take a first-timer anywhere from 5 to 12 hours, often spread across two days, to complete. This contrasts with a professional installation, which typically takes 4 to 8 hours for a single-zone system. The disparity grows with multi-zone systems, which are generally not recommended for DIY installation due to their complexity.
Beyond just the time, professional installation offers crucial benefits. Our expert heating and cooling technicians possess the specialized tools, training, and experience required for precise installation, proper refrigerant handling, and thorough system commissioning. This expertise ensures optimal system performance, energy efficiency, and longevity. Furthermore, professional installation is often a prerequisite for maintaining your system's warranty. Many manufacturers will void warranties if the system is not installed by a certified HVAC professional. DIY attempts, especially those involving traditional systems that require handling refrigerants, carry significant safety risks, including electrical hazards and environmental concerns if refrigerants are improperly managed. For these reasons, we strongly advocate for professional installation to guarantee safety, efficiency, and peace of mind.
Frequently Asked Questions About Mini Split Timelines
We understand that homeowners have many questions when planning a mini split installation. Here, we address some of the most common inquiries regarding installation timelines to provide quick and clear answers.
How long does a single-zone mini split installation take?
A single-zone mini split installation typically takes between 4 to 8 hours. This means that in most standard scenarios, the entire process, from setting up the indoor and outdoor units to testing the system, can be completed within a single day. This makes it a relatively quick and convenient upgrade for targeted heating and cooling needs.
Does the type of indoor unit affect the installation time?
Yes, the type of indoor unit significantly affects the installation time. Wall-mounted units are generally the quickest and most straightforward to install, as they simply require securing to a wall and running the line-set through a drilled hole. Ceiling cassettes, which are flush-mounted into the ceiling, often require more time. This is because they may necessitate custom framing modifications within the ceiling joists, especially if the unit doesn't fit standard joist spacing. Ducted units, which connect to a short run of ductwork, also tend to take longer due to the additional work involved in installing and connecting the ducting. Therefore, while wall-mounted units offer the fastest installation, other types might require more extensive structural work, extending the overall timeline.
Why is professional installation recommended over DIY?
Professional installation is highly recommended over DIY for several critical reasons, primarily related to warranty preservation, specialized expertise, and safety. Manufacturers often require installation by a certified HVAC technician to validate the system's warranty. Attempting a DIY installation can void this warranty, leaving you responsible for any future repairs or replacements. Professionals possess specialized tools, such as vacuum pumps and refrigerant gauges, which are essential for proper system evacuation and charging. Incorrect refrigerant handling can lead to system inefficiencies, premature failure, and environmental damage. Moreover, mini split systems involve high-voltage electricity, and improper wiring can pose serious electrical hazards. Our certified technicians ensure that all electrical connections are safe and compliant with local codes. Professional installation guarantees optimal system performance, energy efficiency, and long-term reliability, safeguarding your investment and providing peace of mind.
Conclusion
Embarking on a mini split installation project is a significant step towards enhancing your home's comfort and energy efficiency. While the question of "how long does mini split installation take" is a common one, we've seen that the answer is nuanced, depending on various factors from the system's complexity to your home's unique characteristics. A single-zone system can often be installed within a day, while multi-zone configurations may require two to three days. By understanding the stages of installation, the factors that influence timelines, and how you can prepare your property, you're better equipped to plan for a smooth and efficient process. Opting for professional installation ensures not only a quicker and safer setup but also guarantees optimal system performance, energy savings, and the preservation of your warranty. We are committed to providing you with efficient heating and cooling solutions that offer long-term reliability and comfort for your home.