Get Ready for Grilling Season: Pro Tips for BBQ Maintenance and Repair
The Essential Grill Maintenance Checklist: From Grates to Casing
 Grilling season is here! We all love the taste of perfectly cooked food from a clean grill. But a great grilling experience starts with proper grill care.
Many grill owners overlook regular maintenance. However, keeping your grill clean is vital. It improves food flavor, prevents dangerous flare-ups, and makes your grill last longer. A well-maintained grill also cooks more evenly. This ensures your food tastes great and your grilling is safe.
This guide will show you how to keep your BBQ in top shape. We'll cover general cleaning tips for all grills. Then, we'll dive into the specific care needed for unique components, like infrared burners. We'll also discuss troubleshooting common issues and when to consider professional help for comprehensive SoCal grill maintenance and infrared cleaning.
Maintaining your grill isn't just about aesthetics; it's about performance, safety, and longevity. A comprehensive cleaning routine ensures that your grill operates efficiently and safely, delivering delicious results every time. Whether you own a traditional gas grill or a high-tech infrared model, a regular maintenance checklist is your best friend.
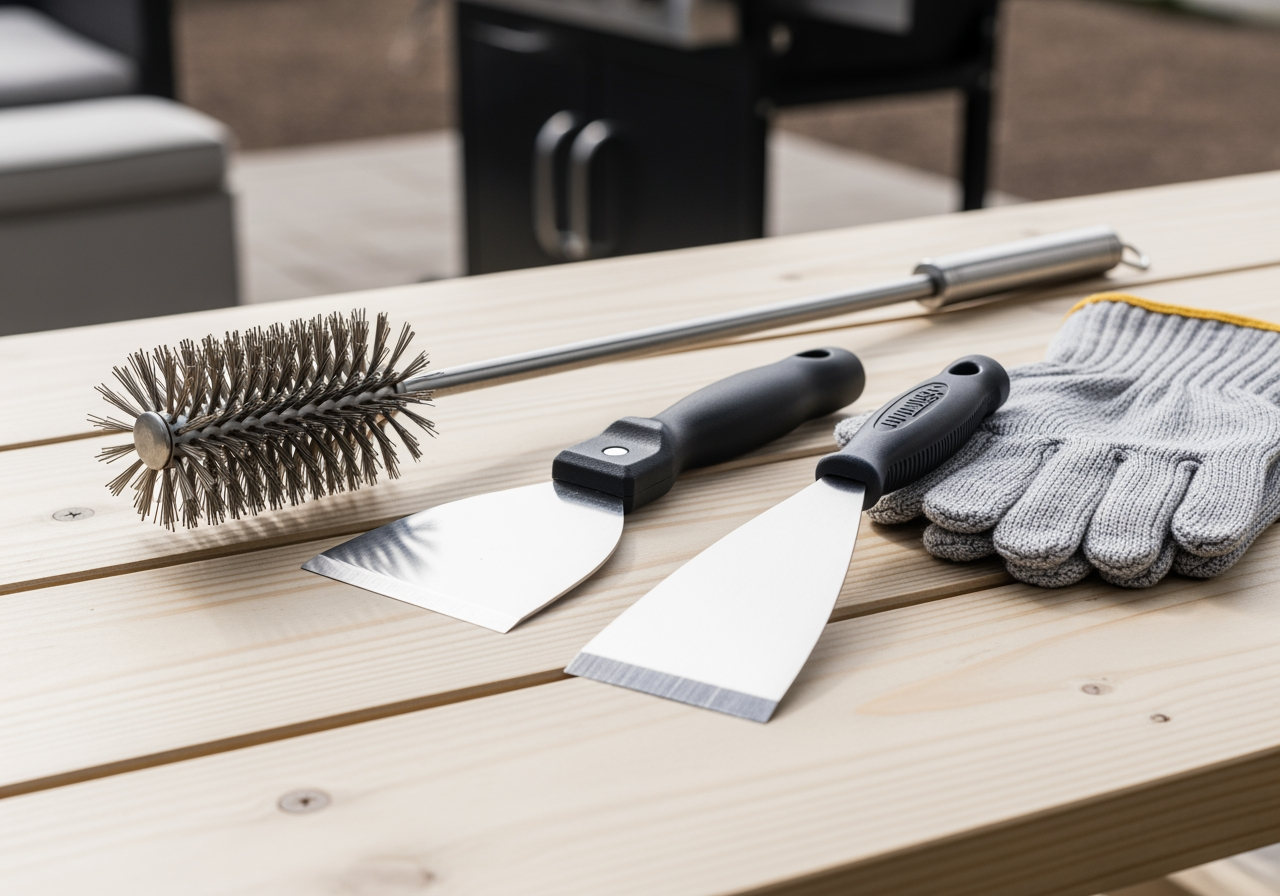
Before you begin any deep cleaning or maintenance, always ensure your grill is completely cool and the gas supply is turned off (if applicable). Safety should always be your top priority. Gather your tools: a sturdy grill brush, a non-scratch scraper, heat-resistant gloves, warm soapy water, and a few microfiber cloths. These tools will be invaluable as we tackle the various components of your grill.
Cleaning the Cooking Grates
The cooking grates are arguably the most frequently used part of your grill, and thus, the most prone to food residue buildup. Proper cleaning of the grates is crucial for preventing food from sticking, ensuring even cooking, and maintaining hygiene.
Scraping Residue: After each grilling session, once the grill has cooled slightly but is still warm, use a grill brush to scrape off any leftover food particles. For stubborn, baked-on residue, a non-scratch scraper or a wooden grill scraper can be highly effective. The key is to remove as much debris as possible before it hardens. Some grill masters even recommend the "burn-off" method (which we'll discuss in detail for infrared burners) to incinerate residual food before brushing.
Soaking Grates: For a deeper clean, especially if your grates are heavily soiled, remove them from the grill. If they are cast iron, be cautious with soaking time to prevent rust. For stainless steel or porcelain-coated grates, you can soak them in a bucket of warm, soapy water for at least two hours, or even overnight. This helps to loosen grease and grime, making scrubbing much easier. After soaking, use a stiff wire brush (for stainless steel) or a soft nylon-bristled brush (for porcelain-coated or cast iron) to scrub away any remaining residue. Rinse thoroughly and dry completely to prevent rust.
Seasoning Cast Iron: If you have cast iron grates, seasoning them after cleaning is essential. Apply a thin layer of high-heat cooking oil (like flaxseed, grapeseed, or vegetable oil) to all surfaces of the grates. Then, place them back in the grill and heat it to a medium temperature for about an hour. This process creates a protective, non-stick layer and prevents rust.
Nylon vs. Wire Brushes: The type of brush you use matters. Stiff wire brushes are excellent for durable stainless steel grates, effectively removing tough grime. However, for porcelain-coated or cast iron grates, wire brushes can scratch the surface, leading to chipping or rust. For these materials, opt for a soft nylon-bristled brush or a specialized grill brush designed for delicate surfaces. Always inspect your brush for loose bristles before and after use to avoid any ending up in your food.
Preventing Food from Sticking: Beyond cleaning, a simple trick to prevent food from sticking is to lightly oil your grates before each use. Once your grill is preheated, dip a paper towel in cooking oil and, using tongs, carefully wipe down the grates. This creates a barrier that helps release food easily.
Deep Cleaning the Grill's Interior
Beyond the grates, the interior components of your grill also accumulate grease and carbonized residue. Neglecting these areas can lead to uneven heating, flare-ups, and premature wear.
Heat Shields and Flavorizer Bars: These components sit directly below the grates and above the burners, designed to distribute heat evenly and vaporize drippings to create flavor. Over time, they become coated with baked-on grease. Remove them and scrape off any loose debris with a plastic putty knife or a non-abrasive scraper. For stubborn buildup, a wire brush can be used on stainless steel versions, followed by a good scrub with warm, soapy water. Rinse and dry thoroughly.
Drip Trays and Grease Management: The drip tray is designed to catch excess grease and food particles that don't vaporize. This is a critical area for fire prevention. Empty and clean the drip tray after every few uses, or more frequently if you cook fatty foods. For permanent drip pans, wash them thoroughly with hot, soapy water. If you use disposable foil liners, replace them when soiled. Neglecting the drip tray allows flammable grease to accumulate to dangerous levels, increasing the risk of grease fires.
Firebox Cleaning: The firebox, or the main body of the grill, can accumulate ash, carbonized grease, and debris. Once the grill is completely cool, use a plastic putty knife or a similar non-abrasive tool to gently scrape off any buildup from the interior walls. For porcelain-coated grill walls, use a cloth or scrub pad with warm, soapy water, then wipe clean with fresh water. Sweep any loose ash and debris into a dustpan for safe disposal. It's important to remove this buildup, as it can affect heat distribution and create unpleasant odors.
Carbonized Grease: What often looks like peeling paint or enamel on the inside of your grill's lid or firebox is usually carbonized grease residue. This isn't a defect in the grill's finish but rather layers of baked-on food and grease. It can be removed by soaking and cleaning with fat-dissolving agents and hot water.
Exterior and System Checks
While the interior gets most of the grime, the exterior and internal systems also require attention for both aesthetics and functionality.
Stainless Steel Polish: For stainless steel exteriors, a simple wipe-down with warm, soapy water and a soft cloth is usually sufficient for light cleaning. For a streak-free shine, follow up with a specialized stainless steel cleaner and polish. Always wipe in the direction of the grain to avoid scratches.
Gas Hose Leak Test: Safety is paramount with gas grills. At the beginning of each grilling season, or if you suspect a leak, perform a gas hose leak test. Mix a solution of equal parts dish soap and water. With the gas tank valve open (and the grill burners off), brush the soapy solution over all gas connections and the entire length of the hose. If you see bubbles forming, you have a gas leak. Immediately turn off the gas, tighten connections, and retest. If the leak persists, replace the hose or contact a professional.
Ignition System Inspection: A reliable ignition system is key to a hassle-free grilling experience. Check the igniter electrodes for corrosion or damage. Gently clean any debris with a soft, dry toothbrush. Ensure the igniter wires are securely connected. If your igniter isn't sparking, check the battery (if applicable) and connections.
Grill Stability: Periodically check that your grill is stable and all wheels (if any) are functioning correctly. Tighten any loose bolts or screws. A stable grill prevents accidents and ensures safe operation.
Specialized Care: A Guide to Infrared Burner Cleaning
Infrared burners represent a significant leap in grilling technology, offering incredibly high temperatures and even heat distribution for perfect searing. However, their unique design, often involving ceramic tiles with thousands of tiny ports, requires a specialized cleaning approach. Unlike traditional tube burners, infrared burners are more delicate and susceptible to damage from improper cleaning methods.
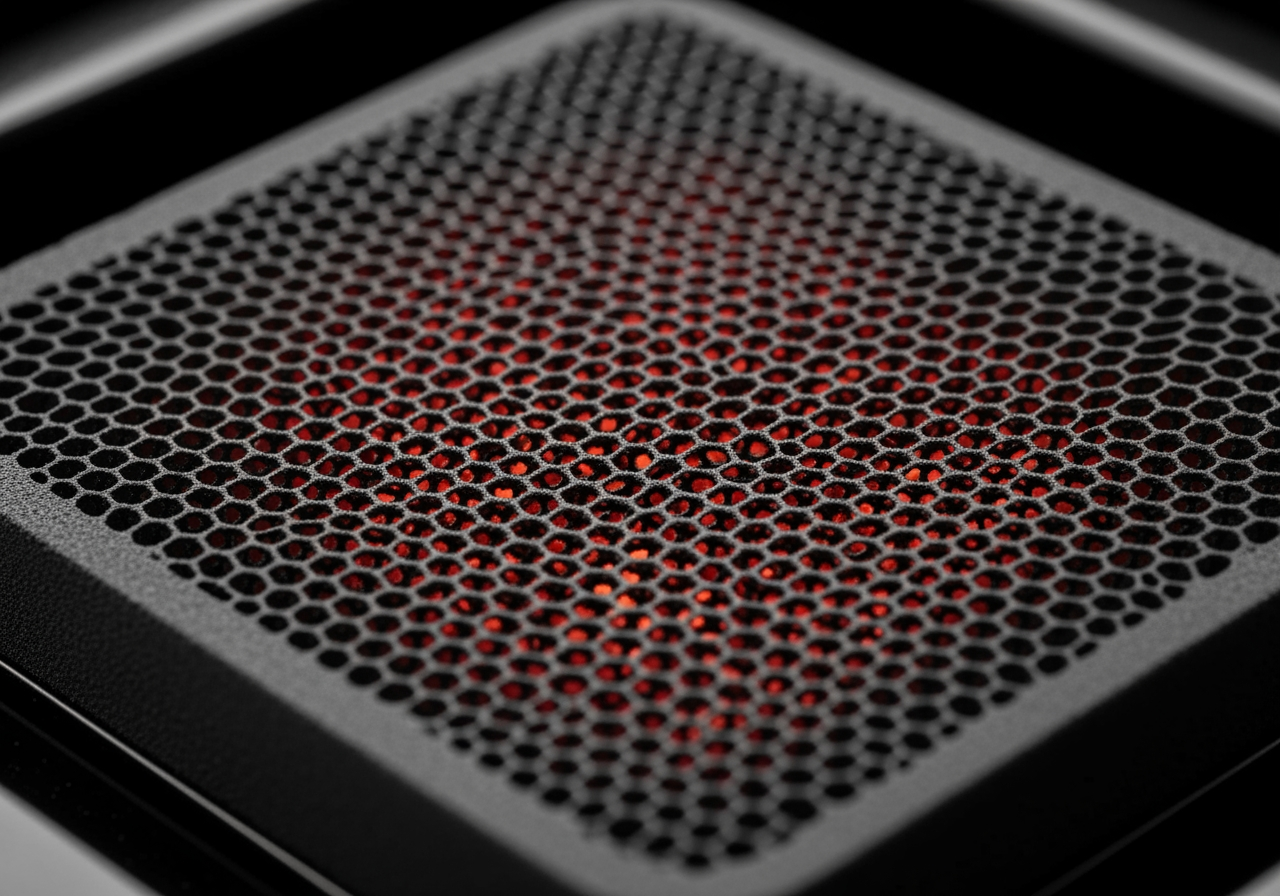
Infrared technology works by superheating a ceramic surface, which then emits intense radiant heat directly to your food. This high-heat cooking means most drippings vaporize upon contact, reducing flare-ups and making cleanup seem easier on the surface. However, residue can still accumulate in the ceramic pores or the burner's internal components, impacting performance.
Routine Maintenance: The Burn-Off Method
The "burn-off" method is not just a helpful tip; it's the cornerstone of routine infrared burner maintenance. Its effectiveness lies in the extreme heat generated by these burners.
Post-Cook Cleaning: Immediately after you finish cooking, while the grill is still hot, close the lid and turn your infrared burner(s) to their highest setting.
High Heat & Duration: Allow the burner to run on high for 5-15 minutes. The exact duration can depend on how messy your cooking session was. This intense heat (often reaching 900-1800°F) will incinerate most of the food drippings, marinades, and grease that have accumulated on the ceramic surface and the cooking grates directly above it.
Vaporizing Grease & Incinerating Residue: This process effectively turns organic matter into fine ash. The extreme temperatures cause most drippings to evaporate as soon as they hit the burner, but the burn-off handles any lingering residue.
Burner Longevity: This routine practice is crucial for maintaining the efficiency and longevity of your infrared burner. It prevents buildup from clogging the tiny ports in the ceramic tiles, ensuring consistent heat output and preventing uneven flames or cold spots.
After the burn-off, turn off the grill and let it cool completely. Once cool, you can gently brush away any remaining ash with a soft-bristled brush.
Advanced Infrared Grill Maintenance
While the burn-off method handles most routine cleaning, periodic deeper cleaning is necessary to address more stubborn blockages and internal components.
Ceramic Ports and Wooden Toothpick: The ceramic tiles on an infrared burner have thousands of tiny ports through which gas flows. Over time, these can become clogged with carbonized residue, affecting the flame pattern and heat output. Never use metal objects like wire brushes or skewers to clear these ports, as they can damage the delicate ceramic. Instead, use a wooden toothpick to carefully poke through any visibly clogged holes. This gentle approach helps restore proper gas flow without harming the ceramic.
Soft Brush: For general cleaning of the ceramic surface after it has cooled, a soft-bristled brush is ideal. Gently sweep away any ash or loose particles. Avoid abrasive brushes or steel wool, which can scratch or damage the ceramic.
Venturi Tubes and Orifice Cleaning: The Venturi tubes are where gas mixes with air before reaching the burner. The orifice is a tiny opening that controls the gas flow into the Venturi tube. These components are critical for proper burner operation. Spiders and insects often build nests in Venturi tubes, causing blockages that can lead to uneven flames, popping sounds (known as "flashbacks"), or even dangerous gas buildup.
To clean:
- Remove the Burner: Carefully remove the infrared burner from the grill. Consult your grill's manual for specific instructions, as this can vary by model.
- Clean Venturi Tubes: Use a Venturi brush (a long, flexible brush designed for this purpose) to clear out any debris, spiderwebs, or insect nests from inside the Venturi tubes.
- Clean Orifices: The orifice is typically located at the end of the gas valve where it connects to the Venturi tube. Use a small, thin wire (like a straightened paper clip – but only if your manufacturer recommends it, otherwise avoid poking the orifice as it can enlarge it and cause calibration issues) to gently clear any obstructions from the orifice. If you're unsure, it's best to leave orifice cleaning to a professional or refer strictly to your grill's manual.
Spider Webs: These are a common culprit for burner issues. Regularly inspecting and cleaning Venturi tubes can prevent these blockages and ensure safe, efficient grilling.
Tools for Infrared Burner Cleaning:
- Soft-bristled grill brush: For gently sweeping ash from ceramic.
- Wooden toothpicks: For clearing clogged ceramic ports.
- Venturi brush: For cleaning inside Venturi tubes.
- Non-scratch scraper: For general grill interior cleaning.
- Heat-resistant gloves: For safety during cleaning.
- Warm, soapy water: For cleaning grates and other components (but not the ceramic burner itself).
Troubleshooting Common Infrared Burner Issues
Even with diligent cleaning, you might encounter specific issues with your infrared burner. Knowing how to troubleshoot can save you time and potentially prevent costly repairs.
Wet Burners: Never use water or liquid chemicals directly on the ceramic tiles of an infrared burner. If your burner accidentally gets wet (e.g., from rain or an accidental spill), it's crucial to dry it thoroughly before use.
- Remove and Drain: Carefully remove the wet burner from the grill.
- Dry Completely: Turn the burner upside down to drain any trapped water. Allow it to air dry completely, which can take anywhere from overnight to several days, depending on humidity. You can place it in a warm, dry area to speed up the process.
- Test: After it's completely dry, reinstall the burner and test it. If it still pops, flares excessively, or doesn't turn a consistent cherry orange within 5 minutes of ignition, the ceramic may be permanently damaged and the burner might need replacement. Burner failure due to wetness is typically not covered under warranty.
Popping Sounds: A popping or booming sound, often accompanied by an uneven flame pattern, usually indicates a blockage in the gas flow. This is frequently caused by clogged ceramic ports or obstructions in the Venturi tubes (often spiderwebs). Follow the advanced cleaning steps above for ceramic ports and Venturi tubes. If the issue persists, it could indicate a more serious problem with the gas regulator or burner assembly.
Uneven Flames: If your infrared burner isn't heating evenly or has "cold" spots, it's a clear sign of clogged ports on the ceramic tile. Use a wooden toothpick to clear these ports as described earlier.
Cracked Ceramic: Inspect your ceramic tiles regularly. Cracks or chips in the ceramic are a serious issue. A cracked tile can cause gas to escape unevenly, leading to dangerous flare-ups, inconsistent heating, and potential burner failure. Unfortunately, a cracked ceramic tile usually means the entire burner needs to be replaced. Continuing to use a burner with a cracked ceramic is not safe.
When to Call a Pro: While many cleaning and minor troubleshooting tasks can be handled at home, there are times when professional intervention is necessary. If you've followed all cleaning steps and your burner still malfunctions, if you suspect a gas leak, or if you're uncomfortable disassembling grill components, it's always best to consult with experts. For issues like persistent popping, significant gas flow problems, or damaged components that require replacement, professional grill services offer the expertise and specialized tools needed. They can diagnose complex issues, perform intricate repairs, and ensure your grill operates safely and efficiently. You can find reliable assistance for such needs through dedicated grill repair and maintenance services.
Advanced Grill Maintenance and Repair Fundamentals
Beyond routine cleaning, understanding basic maintenance and repair can significantly extend the life of your grill and ensure it's always ready for action. This involves knowing when a part is at the end of its life and how to safely replace common components.

Identifying When Parts Need Replacement
Regular inspection is key to identifying worn or damaged parts before they cause major issues or compromise safety.
Worn Burners: Over time, even the most durable burners can corrode or develop holes, leading to uneven heat distribution and reduced performance. For infrared burners, look for significant discoloration, crumbling ceramic, or persistent uneven flames even after cleaning. For traditional tube burners, check for rust-through or large cracks. If a burner is severely compromised, it will need to be replaced.
Cracked Grates: Cooking grates can crack, warp, or rust over time. Cracks can harbor bacteria and make food stick, while warping leads to uneven cooking. Rust, especially on cast iron, can be managed with cleaning and seasoning, but severe rust might necessitate replacement.
Rusted Heat Shields: Heat shields (or flavorizer bars) protect burners from drippings and help vaporize grease. If they are severely rusted or have large holes, they won't perform their function effectively, leading to flare-ups and burner damage.
Faulty Igniters: If your igniter consistently fails to spark, even after checking connections and batteries, it's likely faulty. A reliable igniter is crucial for convenient and safe grill startup.
Uneven Heating and Performance Decline: If your grill consistently exhibits cold spots, takes an unusually long time to heat up, or struggles to maintain temperature despite proper cleaning and gas flow, it could be a sign that multiple components are degrading and may need replacement. Sometimes, a full set of new burners, heat shields, and grates can breathe new life into an aging grill. For all your grill replacement needs, from igniters to full burner assemblies, explore reliable providers of Grill Replacement Parts.
A Basic Guide to DIY Grill Repair
While complex repairs should be left to professionals, many common issues can be addressed with a bit of know-how.
Safety First: Before attempting any repair, always turn off the gas supply at the tank or natural gas line. Disconnect the gas tank if you're working on a propane grill. Ensure the grill is completely cool. Wear appropriate safety gear, including gloves and eye protection.
Gas Supply Off: This cannot be stressed enough. Working on a gas grill with the gas supply connected is extremely dangerous.
Replacing an Igniter:
- Access: Locate the igniter assembly, usually near the control panel or inside the firebox.
- Disconnect: Carefully disconnect the igniter wire from the module and remove any mounting screws or clips holding the old igniter in place.
- Install New: Install the new igniter, ensuring the electrode is positioned correctly relative to the burner. Reconnect the wire.
- Test: Turn on the gas supply and test the new igniter.
Replacing a Burner Tube (Traditional Gas Burners):
- Remove Grates/Heat Shields: Remove all cooking grates and heat shields to access the burners.
- Disconnect: Disconnect the burner from the gas valve orifice. This usually involves removing a screw or lifting it out of a bracket.
- Remove Old: Slide the old burner out of the firebox.
- Install New: Slide the new burner into place, ensuring it aligns correctly with the gas valve orifice. Secure it with any necessary screws or clips.
- Test: Reinstall heat shields and grates, turn on gas, and test for even flame.
Sourcing Replacement Parts: When replacing parts, always opt for genuine manufacturer parts or high-quality aftermarket equivalents that are specifically designed for your grill model. Using incorrect parts can compromise performance and safety. Many online retailers and specialty stores offer a wide range of grill parts. For a comprehensive range of services, including expert diagnostics and reliable repairs, consider professional Grill Services.
Frequently Asked Questions about Grill Maintenance
We often encounter similar questions from grill enthusiasts looking to keep their barbecues in prime condition. Here are some quick answers and expert tips to address common concerns.
How often should I deep clean my entire grill?
The frequency of cleaning depends on how often you grill and what you cook.
- After 3-5 Uses (Lighter Cleaning): After every 3-5 grilling sessions, we recommend a thorough lighter cleaning. This involves the burn-off method (for infrared burners), cleaning grates, emptying drip trays, and wiping down interior surfaces. This prevents heavy grease buildup.
- Biannual Inspection: At least twice a year, an infrared grill should be inspected for wear, paying close attention to any damage to the heating element, the infrared plate, and the grate. This is a good time to check for cracks, corrosion, and proper function of all components.
- Annual Deep Clean: Once a year, ideally before the peak grilling season or at the end of it, disassemble your grill for a comprehensive deep clean. This means removing all internal components (grates, heat shields, burners) and cleaning the firebox, manifold, and exterior thoroughly. This annual overhaul helps address hidden issues, prevent long-term damage, and ensures your grill is ready for another year of delicious meals.
Can I use oven cleaner on my grill?
No, absolutely not. Oven cleaners contain highly caustic chemicals that are designed to strip away baked-on grease from oven interiors. These chemicals are far too harsh for grill surfaces, especially for delicate components like infrared ceramic tiles, stainless steel, or porcelain coatings. Using oven cleaner can:
- Damage Finishes: It can strip protective coatings, discolor stainless steel, and erode aluminum parts.
- Corrode Components: The chemicals can cause premature corrosion and rust on metal parts.
- Leave Toxic Residue: If not thoroughly rinsed (which is difficult with a grill), residual chemicals can vaporize when you cook, contaminating your food with harmful fumes and flavors.
Instead, stick to warm, soapy water for most surfaces. For tougher grease, use commercial grill cleaning products specifically designed for barbecues, which are formulated to be effective yet safe for grill materials. Baking soda mixed with water to form a paste can also be an effective, non-toxic alternative for stubborn spots on grates or interior surfaces (avoiding ceramic burners).
What's the best way to deal with rust on my grill?
Rust is the enemy of any metal grill component, but it can often be managed or prevented.
- Surface Rust: For light surface rust on grates or other metal parts, you can often remove it with a stiff wire brush or steel wool. For more stubborn spots, buff the rusted area with fine sandpaper.
- Cleaning the Area: After removing the rust, clean the area thoroughly with warm, soapy water to remove any rust particles.
- Seasoning with Oil: For cast iron grates, seasoning them with a high-heat cooking oil after cleaning will create a protective barrier against future rust. For other metal components, a light coat of cooking oil can also offer some protection.
- Preventing Future Rust: The best defense against rust is prevention. Keep your grill clean and dry. Use a grill cover to protect it from the elements. If you live in a humid climate or near saltwater, consider applying a rust-inhibiting spray or wax to exterior metal surfaces (avoiding cooking surfaces). Promptly touch up any chips in paint or porcelain finishes, as these exposed areas are prime targets for rust.
Conclusion: Keep Your Grill in Peak Condition for Years to Come
Regular grill maintenance is more than just a chore; it's an investment in your grilling experience, your safety, and the longevity of your equipment. From the essential cleaning of grates and interior components to the specialized care required for delicate infrared burners, each step plays a crucial role.
By consistently performing routine burn-offs, conducting periodic deep cleans, and addressing issues like clogged ports or wet burners promptly, you ensure your grill operates at peak performance. Remember to always prioritize safety, using the right tools and knowing when to call on professionals for complex repairs or comprehensive services. Accept these pro tips, and you'll enjoy countless seasons of delicious, perfectly grilled meals from a well-maintained BBQ.